• Skip to primary navigation
  • Skip to main content
  • Skip to primary sidebar
  • Skip to footer

Armstrong Home Inspection Service, LLC

Home Inspector or Home Inspection

  • Home
  • About
  • Services
    • Buyers Pre-Purchase Home Inspection
    • Sellers Pre-Listing Home Inspection
    • Manufactured Home Engineers Foundation Certification
    • “Quick Look “Walk Through Home Consultation
    • Radon Testing
    • Water Quality Testing
    • Infrared Thermal Imaging
  • Pricing
  • Sample Reports
  • Contact Us
  • Blog
    • 10 Easy Ways to Save Money and Energy in Your Home
      • Helpful Tips for First-Time Home Buyers
      • Making Your Home Burglar-Resistant
      • Manufactured Housing and Standards
      • Modular vs. Manufactured Homes
      • Moisture Intrusion
      • Mold, Moisture, and Your Home
      • Non-Conforming Bedrooms
      • Permanent Wood Foundations
      • Radon
      • Tie-Downs for Manufactured Homes
      • Water Quality
    • 15 Tools Every Homeowner Should Own
    • Barbeque Safety
    • Basic Waterproofing for Basements
    • Building a Home
    • Carbon Monoxide Poisoning and Detectors
    • Changing the HVAC filter
    • Choosing a Manufactured Home
    • Choosing the Right Home Inspector
    • Electrical Safety
    • Geothermal Heating and Cooling Systems
    • Ground-Fault Circuit Interrupters (GFCIs)
  • Schedule Inspection

Tie-Downs for Manufactured Homes

Tie-Downs for Manufactured Homes

by Nick Gromicko, CMI® and Kenton Shepard
Tie-down strap used to secure a mobile home

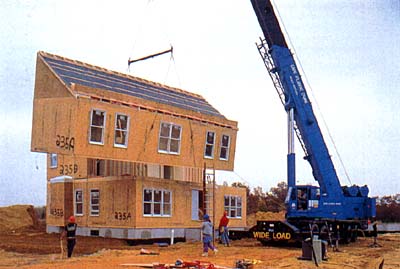
Tie-downs are systems of heavy-duty straps and anchors designed to stabilize manufactured homes (also known as mobile homes) during high winds. Failure to properly install and maintain tie-downs results in reduced capacity to resist sliding and overturning.

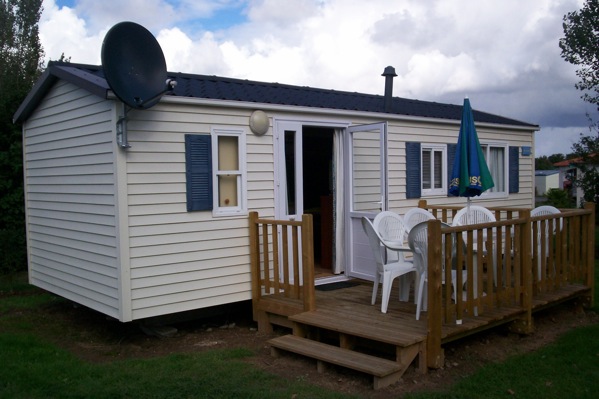
Manufactured homes are more easily flipped or damaged during windstorms than site-built homes and they require tie-downs to remain stable. Manufactured homes are elevated and vulnerable to the forces of wind uplift if they are not equipped with skirting.  Wind passing over the top of such homes can exacerbate the effect. Also, manufactured homes are relatively lightweight when compared with site-built homes.

Two types of tie-downs include:

  • over-the-top tie-downs, which are straps that are placed over the siding and roof. Some manufactured homes come equipped with concealed over-the-top tie-downs, which are located just under the exterior siding and metal roof. The end of the strap hangs out under the manufactured home. While this is an effective system, it detracts from the appearance of the home. Single-wide manufactured homes, as they are lightweight, generally require over-the-top tie-downs as well as frame anchors; and
  • frame anchors. These straps attach to the home’s frame rails. Many newer manufactured homes, as they are structurally superior to older models, may be secured solely with frame anchors. Double-wide models are also generally heavy enough to resist winds without the aid of over-the-top tie-downs, although they, too, require frame anchors.

Tie-Down Components 

  • Ground anchors are metal rods driven into the ground to secure the tie-down tightly in place. A number of different types of ground anchors are available to suit various soil conditions. Auger anchors, for instance, have been designed for use in both hard soil and soft soil. Rock anchors or drive anchors allow the attachment to a rock or coral base. As only several inches of the anchors will be above the ground, inspectors will not be able to tell which type is used.
  • Hook-up and tension devices work in conjunction with tie-downs. The tie-down must be connected to the anchor with a Ground anchors for mobile home tie-downssystem that allows for the tension to be adjusted. This system must also be weather-resistant and strong enough to support as much weight as the anchor and tie-down. If the tie-down is fastened to a ground anchor with a drop-forged turnbuckle, it should be ½-inch or larger galvanized steel. The turnbuckle should have forged or welded eyes, and not hook ends, as the tie-down could slip from hook ends.
  • For exposed over-the-top tie-downs, there must be some sort of roof protectors placed under the strap at the edge of the roof. These prevent the tie-down strap from damaging the roof and will prevent the edge of the roof from cutting through the tie-down. Commercial protectors are available which distribute the pressure of the strap.

Safety and Maintenance Tips That InterNACHI inspectors Can Pass on to Their Clients

  • Check for loose straps. Straps should be tight and straight. The manufacturer’s guidelines can be consulted for determining proper tension of the strap.
  • Replace straps and anchors that show signs of corrosion or damage.
  • A longitudinal tie-down system can be installed as an additional safety feature. This system uses straps that cross the length of the home, rather than its width.
  • Turnbuckles, which are devices designed for adjusting the tension and length of straps and cables, should have welded eyes or forged eyes instead of hooks because hooks can slip.
  • Find out the required number of straps for your area and make sure your home complies.
  • Make sure straps and ground anchors are not damaged or corroded. If they are, they should be replaced immediately.
  • Owners of manufactured homes should contact their local building department to find out how many tie-downs are necessary for such homes in their area. Regulations vary considerably by jurisdiction, and generally depend on the size of the home and the wind risk. In some states, such as Florida, tie-downs are stringently regulated and inspected.
  • Straps should not be kinked or bent, or otherwise abnormally stressed.
  • Straps must be protected at sharp edges with radius clips.
  • Anchors must be installed to full depth.
In summary, tie-downs are used to prevent wind damage to manufactured homes.

Modular vs. Manufactured Homes

Modular vs. Manufactured Homes

by Nick Gromicko, CMI® and Kenton Shepard

While the terms “modular home” and “manufactured home” refer to two very different things, they are sometimes used interchangeably. Perhaps some of this confusion stems from the fact that modular homes are, in fact, manufactured (“manufactured” might be an unfortunate label.) Also, traditional “site-built” homes are not necessarily better than modular homes, despite the stigma associated with their assembly-line origin. There have been cases where Realtors and builders of manufactured homes have misrepresented manufactured homes as modular homes, and buyers were not informed enough to know the difference. Everyone (especially inspectors, who make their living examining residences) should understand the distinguishing features of these two types of houses.

Modular Homes
Modular homes are residences constructed entirely in factories and transported to their sites on flatbed trucks. They are built under controlled conditions, and must meet strict quality-control requirements before they are delivered. They arrive as block segments and are neatly assembled, using cranes, into homes that are almost indistinguishable from comparable ones built on-site. Wind and rain do not cause construction delays or warp building materials. In addition, modular homes:
  • must conform to the same local, state and regional building codes as homes built on-site;
  • are treated the same by banks as homes built on-site. They are easily refinanced, for example;
  • follow the same market trends as site-built houses;
  • must be structurally approved by inspectors;
  • can be of any size, although the block sections from which they are assembled are uniformly sized;
  • are often more basic than homes built on-site, but they tend to be sturdier;
  • are highly customizable. Design is usually decided by the buyer before construction has begun; and
  • generally take eight to 14 weeks to construct. Differing from a site-built home, the foundation can be dug at the same time that the house is being constructed.

Proponents of modular homes claim that their indoor, environmentally controlled construction affords them greater strength and resilience than homes built on-site. They also tend to be constructed using more precise building techniques and with more building material than comparable site-built residences. One reason for this is that they must be able to withstand the stress of highway transport. A study by FEMA found that modular homes withstood the wind and water from Hurricane Andrew better than most other homes in the area. They take less time to construct than site-built homes, are more energy-efficient, and generally cost less.


Manufactured Homes
The term “manufactured home” is the most recent label for what were once called “mobile homes” or “trailers.” They are relatively inexpensive, small, and are held to less stringent standards than modular and site-built homes. Their obvious advantages are their mobility and affordability, factors that allow buyers to make home purchases without a serious monetary or geographical commitment. They are available in three sizes that escalate as follows: “single-wide,” “double-wide” and “triple-wide.” In addition, manufactured homes:
  • conform only to Housing and Urban Development (HUD) code. Some homes contain a red tag that confirms that the unit was manufactured in compliance with this code;
  • are inspected, but do not have to be structurally approved by an inspector;
  • are manufactured in sections at factories;
  • are never more than one story;
  • do not have a permanent or conventional foundation;
  • tend to lose value over time because they are difficult to expand or improve;
  • are transported to the site on their own wheels;
  • are transported on steel chassis that are never removed;
  • are often placed on property owned by others, such as public land that is leased by the homeowner;
  • are treated as a separate lending category from modular and on-site built homes; and
  • are rarely custom-designed. The buyer can choose from homes that have already been built and receive it within days.
Despite their manufacturing process, modular homes are essentially the same as homes that are built on-site. They are treated the same under the law, and their basic structural features are almost indistinguishable from site-built homes, once assembled. Manufactured homes are relatively small, inexpensive, mobile residences that require a smaller commitment than is required by modular and site-built homes. It is important to understand the differences between these home types in order to reduce the influence of stigmas, misrepresentation and ignorance.

Manufactured Housing and Standards

Manufactured Housing and Standards

The term “manufactured home” was adopted in 1980 by the the U.S. Congress to describe a type of house that is constructed in a factory to comply with a building code developed by the Department of Housing and Urban Development (HUD). In the past, manufactured homes were called “mobile homes,” a term that many people still use. However, “mobile” is no longer an accurate name because fewer than 5% of such homes are ever moved off the owner’s original site.

Warranties and Other Protections for the Home Buyer

Federal standards and written warranties protect buyers of manufactured homes. Every manufactured home now offered for sale has a small red and silver seal that certifies that the home has been inspected during construction and meets federal home construction and safety standards. These standards were developed to assure a suitable level of performance in every manufactured home constructed in the U.S. Such standards, together with the manufacturers’ warranties, serve to protect you — the home buyer.

Federal Construction and Safety Standards
Since mid-1976, all manufactured homes have been constructed to meet the federal building standards adopted and administered by HUD. This national code is called the National Manufactured Home Construction and Safety Standards. The code regulates manufactured home design and construction, strength and durability, fire-resistance, and energy-efficiency. It also prescribes the performance standards for the heating, plumbing, air conditioning, thermal, and electrical systems. The National Manufactured Housing Construction and Safety Standards Act also requires that you receive a homeowner’s manual when you buy your home. This manual will explain, among other things, what to do if something goes wrong with your home. Some of the important subjects covered in the homeowner’s manual include general maintenance, safety (including a fire-safety checklist), and state agencies involved in enforcing the federal manufactured home standards.
 
The Manufacturer’s Warranty
Warranties vary among different manufacturers. Ask to see the warranties on the manufactured homes that interest you and compare them before you buy. All retailers are required to have copies of the manufacturers’ warranties that are offered on the homes they sell, and they will make them available to you if you ask to see them. By reading the warranty before you buy your home, you can make sure the home you buy is covered by the kind of warranty protection you want.

When you buy your manufactured home, you will receive the manufacturer’s written warranty from your retailer. The manufacturer’s written warranty usually covers substantial defects in workmanship in the structure, including factory-installed plumbing, heating, and electrical systems, and factory-installed appliances (and these also may be covered by appliance warranties). It is important to understand that the manufacturer’s warranty will not provide coverage for problems resulting from lack of proper installation or maintenance, accidents, owner’s negligence, or unauthorized repairs. Therefore, to make sure that your home’s warranty will be honored, carefully follow the manufacturer’s instructions for installing, maintaining and repairing your home. In many cases, the retailer will perform service under the manufacturer’s warranty. However, it is the manufacturer who has the final responsibility. Be aware that if the retailer must order parts from the manufacturer to make a warranty repair, shipping and delivery of those parts may affect the amount of time it takes to get service. Before you buy your manufactured home, ask to see the written warranties offered on the homes that the retailer sells. Manufacturers warranties cover many, but not all, types of potential problems.

The answers to the following questions should help you get the kind of warranty protection you want:

  • What warranties come with the manufactured home? You may get warranties from the home manufacturer, the retailer, the transporter, the installer, and the appliance manufacturers.
  • What exactly does each of these warranties cover? What don’t they cover?
  • Do the manufacturer’s or retailer’s written warranties on the home cover transportation and installation? If not, are installation and transportation covered by separate, written warranties?
  • How long do the warranties last?
  • How do you get warranty service?
  • Who will provide service under the warranties?
  • Where will the warranty service be performed?

Consider these important questions about warranty coverage before you decide which home to buy. “Implied warranties” are unspoken, unwritten promises created by state law. Ask to see all warranties in writing. Make sure you understand who offers the warranty, who performs the service, and what is and is not covered before selecting and buying your manufactured home. In addition to any written warranty offered by the manufacturer, you may have certain “implied warranties” when you buy a manufactured home. An implied warranty includes the unspoken, unwritten promise that a product is fit to be sold and used for its intended purposes–for example, that a manufactured home is fit to be sold and lived in. Such implied warranties protect you even if no written warranty is offered by the manufacturer or retailer. Most states allow sales that exclude implied warranties (or “as is” sales). However, some states do not permit a seller to exclude or limit implied warranties. Contact your state or local consumer protection office to ask about implied warranty protections in your state. When buying a manufactured home, especially a used one, make sure you know whether it is being sold “as is” — with no implied or written warranty.

The Retailer’s Warranty

A retailer may offer a written warranty on a home. Written warranties are not alike. But, typically, the retailer’s warranty will tell you the terms of the warranty, what you must do to keep the warranty in effect, what you can reasonably expect from the retailer, and that the home has been installed according to manufacturer specifications and local regulations. The warranty also will guarantee that the home has a HUD inspection seal, and that optional appliances and equipment have been properly installed. Remember to ask to see the retailer’s warranty before buying to check on what it does and does not cover. You should know that a retailer’s warranty will not provide coverage for problems that arise from owner’s negligence, failure to provide proper notice for service, and unauthorized repairs.

Appliance Warranties

The appliances in your home will also be covered by warranties. In many cases, these warranties, along with use and care manuals, are provided by the individual appliance manufacturers. In addition, some states require that the home manufacturer’s warranty cover the appliances that come with your home. Read the appliance warranties and note the duration and terms. In addition, check instructions in the warranty about how to get service. In most cases, the quickest service can be obtained from the appliance manufacturer’s authorized service centers. Check the use and care information on the appliance warranties for a list of such service centers or service agents. However, if warranty service is not available from the appliance manufacturer or its servicer, contact your retailer for assistance. The home manufacturer’s warranty, if any, may provide warranty service for your problem. The retailer may offer a written warranty, but not everything will be covered.

Placement and Selection of Your Manufactured Home

Manufactured homes offer a wide variety of styles and prices. There is a manufactured home to fit almost every budget. Some models are designed for those whose budgets limit them to a lower-cost home. Other models have such higher-priced features as cathedral ceilings, formal dining rooms, and wood-burning fireplaces. The home can be a single-section unit or a larger multi-section unit. Multi-section homes come from the factory in two or more parts that are joined at the site. A single-section home comes from the factory as one complete unit. With more than 150 companies building manufactured homes in more than 400 factories, and with manufactured home sales centers located throughout the United States, you have an opportunity to choose from a wide variety of home styles.

Placing Your Manufactured Home

Before you select and buy your home, you should decide where it will be located. There are three basic options you can consider. First, you could plan to place your manufactured home on land you own or intend to buy. If you choose this option, you must consider zoning laws, restrictive covenants, and hookup regulations. Such restrictions may prevent you from placing a manufactured home on a particular piece of land. Second, you could plan to place your manufactured home on a leased homesite in a manufactured housing development, in which case the company managing the development will normally take care of these considerations. Third, you could decide to buy a home already on a homesite in a planned community. Then, of course, you would not be faced with the typical placement concerns.

Placing Your Home on Your Own Land
If you own or plan to buy land for your manufactured home, there are several matters you should consider.
  • zoning:  In cities and suburban areas, and in some semi-rural areas, you may face zoning requirements that must be met. In certain areas, there may be a prohibition against manufactured homes, or certain requirements regarding their size and exterior appearance. You can find out if there are any restrictions or requirements by contacting the local community’s planning and land use department. Consult your local telephone directory for the office nearest you.
  • restrictive covenants:  These are limitations in property deeds that control how you can use the land. These may include a requirement that homes be a certain size, or a prohibition that lands not be used for certain purposes. The title search, conducted when you buy the land, may reveal information about such restrictions. Sometimes, however, the restrictions are described in ways that are difficult to understand. You may want to check with an experienced real estate attorney to see if there are any restrictive covenants that would keep you from placing your home on the land you are considering.
  • utilities:  Although a manufactured home comes complete with plumbing, electrical, and heating systems, it must, like all homes, be connected to electrical, water and sewage facilities. If your site is in a well-developed area, all necessary utilities may be available, subject to connection charges. Find out exactly what utilities are available and how much it will cost to connect your home to all utility sources. Contact your local public utilities division for information about utility services in your area. Make sure that the applicable zoning laws and the deed on your land will allow a manufactured home to be placed there.
Placing Your Home in a Rental Community
You may want to place your home on a leased site in a community especially planned for manufactured housing. Placing your home in such a community usually involves fewer practical problems. If you are interested in a rental community, visit the ones in the area where you wish to live. In addition, some manufactured home retailers may operate their own rental communities, so you may wish to ask the retailer for information and advice about them. Find out what each community offers and the differences among them, including the financial aspects, such as rental and installation costs and any miscellaneous service charges. There also are several questions you will want to ask before deciding upon a particular rental community.
  • Is a written lease required and, if so, for how long?
  • What are the charges for utility connections or other services?
  • Do the community’s rules require that it be responsible for installing your home, or can you let your retailer do the job?
  • What charges will be made for installation? Who will be responsible for ground maintenance, snow removal, refuse collection, street maintenance, and mail delivery?
  • What are the community’s rules and regulations? For example, are pets prohibited? Can you accept and live with such rules?
  • Are there any special requirements or restrictions when you sell your home?
  • Are there any provisions to protect you if the owner of the manufactured home community where you lease your homesite sells the property for another purpose?
Here are some issues regarding utilities that you must consider when placing your manufactured home in a rental community:
  • electrical facilities: Electricity is usually available in all areas. But if the area where you plan to live does not have ready access to electric power, connection could be quite expensive. Check with the local power company to find out whether electricity is readily accessible.
  • water facilities: In many locations, there may not be local government-supplied water lines. If there is no water, you may have to drill a well. Do not assume that all drilling will provide water. Check with a local well-drilling company about costs and whether success is guaranteed. Also, check with local health authorities to make certain there are no problems with the quality of the water in the area.
  • sewage facilities: Many areas still rely on septic tank systems instead of a city or county sanitary sewage system. If you cannot connect your home to a sewage system, you must check with local authorities about installing a septic tank. Properly installed septic systems can work quite well. But sometimes they cannot be used, for example, where there is soft ground that is not able to absorb the discharged waste. For more information, contact the local health department or the office responsible for granting building permits.

Buying a Manufactured Home in a Planned Community

You may want to consider another alternative and buy a home that already is located in a planned community. As with a rental community, there are fewer practical problems involved because you do not have to concern yourself about placement. Be sure to check into the costs, services, and rules of any planned community before you buy. You should consider the matters such as who is responsible for utility connections, if there will be any restrictions on resale of your home, and whether you can live with that community’s rules.
Choosing a Manufactured Home
There are several matters you may want to consider when choosing a home.
  • How do I want my home to look?

You may select from a variety of exterior designs, depending upon your taste and your budget. External siding options come in a variety of colors and materials, including metal, vinyl, wood and hardboard. You also may select such outside design features as a bay window, a gable front, or a pitched roof with shingles. Awnings, enclosures around the crawlspace, patio covers, decks, and steps also are available.

  • What size home and floor plan do I want or need?

Manufactured homes are available in a variety of floor plans that include spacious living rooms, dining rooms, fully equipped kitchens, one or more bedrooms, family rooms, and utility rooms. Depending upon your needs and the size of your lot, you can choose a single-section home plan or a larger multi-section design. Homes range in size from 400 to 2,500 square feet.

  • Check state laws.

They may limit the movement of your home after installation. If there is a chance that you might relocate your home to another state, find out about state laws covering transportation of manufactured homes. Some states, particularly eastern states, have certain regulations, such as weight, size or width limitations, that may prevent you from moving your home. Before you purchase, check with the appropriate authorities in the states through which you may want to transport your home. If you do move your home, you will be faced with extra expenses. Besides transporting costs, which include licensing fees to take your home through a state, you will have the cost of foundation construction, installation, and utility hookups.

  • What interior options and features are available?

Manufactured homes have many options and features for a variety of floor plans. You can also choose color and quality options for carpets and wall coverings, and you can choose other features, such as custom cabinets, window designs, and wood-burning fireplaces. Some home models and manufacturers offer more custom options than others. Ask your retailer what options are offered on the homes they sell.

  • What appliance packages are available?

Most manufactured homes are sold with a refrigerator and range. But some appliance packages may include a microwave oven, trash compactor, garbage disposal, washer/dryer, and built-in indoor grill. Central air conditioning also is an option. Be sure your energy package is designed for the climate zone where your home is located.

  • What energy-efficiency options are available?

The National Manufactured Home Construction and Safety Standards require separate energy-efficiency levels for the three different temperature zones of the United States. However, you may wish to increase your home’s energy-efficiency. There are a variety of optional energy packages available, such as increased insulation, double- and triple-glazed windows, sheathing products, self-storing storm windows, and high-efficiency water heaters, furnaces, refrigerators, and air conditioners. Ask your retailer about available energy-saving features and their costs. You should especially note the “Heating Certificate,” which specifies the temperature zone for which the home is designed, and the “Comfort Cooling Certificate,” which specifies the appropriate central air-conditioning system for the home. Both certificates are located on the inside of the home. You should not place your home in a climate zone for which it was not designed.

  • What written warranty coverage is offered on the home, its transportation, and its installation on the homesite?

Nearly all manufacturers offer a written warranty on the home itself. There are, however, important differences among warranties. For example, manufacturers’ warranties may exclude coverage of installation and transportation, although reliable retailers or contractors usually offer written warranties on these services. Although you may never need such warranty services, it is a good idea to check the coverage of any warranties that are offered before you buy. 

Buying a Manufactured Home

Most likely, you will buy your home from a retail sales center, although today, in some states, you also could buy your manufactured home from a real estate agent if the home is already located in a community. Some retail sales centers are owned and operated by a home manufacturing company, but most retail businesses are independently owned and operated. They sell homes built by several manufacturers. You should use as much care in choosing your retailer as you do in choosing your home and its features. This is because the retailer will help you choose your home and, if you wish, custom-order it from the factory. In addition, the retailer will usually be the one responsible for having your home delivered and installed. The retailer may also arrange for financing and insurance for your home. Finally, after you move into your home, your retailer will likely be the person you contact for warranty service.

One of the best ways to find a reputable retailer is to talk with friends who live in manufactured homes and get their recommendations. You also might ask them to recommend a home manufacturer. You may wish to contact your local Better Business Bureau to find out if a particular retailer or manufacturer has a record of unsettled or unresolved complaints on file. You may also wish to contact your state manufactured home association and request the names and addresses of manufacturers or retailers in your area. Compare warranties offered by various manufacturers and retailers.

Site Preparation, Transportation and Home Installation

Proper site preparation and installation are necessary for comfort, durability, and correct functioning of your home. Make sure the transporting company warrants its services in writing. Before your home is installed, you must ensure that the site has been prepared properly. If you are placing your home on your own land, your retailer can provide advice on how to prepare the site. If you will be living in a rental community, the community manager will probably take care of site preparation. Before signing your lease, ask about this and any other costs.

Site Preparation
If you are having your home installed on your own land, you are responsible for site preparation. However, it is a good idea to ask your retailer (or whoever is going to install your home and warrant the installation) to inspect the site prior to installation to make sure that everything has been prepared properly. As always, a qualified InterNACHI inspector should be hired. Here are some guidelines that must be followed in preparing the site:
  • The site must be accessible by the truck transporting your home.
  • The site must be as level as possible.
  • The precise site area must be cleared of trees, rocks, and any other surface debris.
  • The soil must be graded and sloped for water runoff.
  • The soil must be compacted so that the foundation will not sink or shift on loose earth-fill.

Although you may be able to do some work yourself, such as removing trees and shrubs, most site-preparation tasks, such as grading and compacting the soil, require technical expertise. You will need to contract for expert assistance to ensure that your home is installed on firm land that adequately drains.

Transporting Your Home

In most instances, your home will be transported first from the factory to the retail sales center. At the center, your retailer will use a checklist to make sure your home has arrived undamaged, and if any problem occurred while your home was being transported from the factory, it will be repaired before delivery to your homesite. If any damage occurs while the home is being transported to your site, the company transporting your home is usually responsible. Therefore, you should check for damage as soon as your home is delivered. If you find any damage, contact the transporting company immediately. If you allow your home to be transported by a company that does not provide a written transportation warranty, it may be difficult to obtain free repairs, if any are necessary. Therefore, before you purchase your home, make certain that the transporting of your new home is protected by a written warranty.

Installing Your Home

After you have chosen the retailer and your home, have complied with local building and zoning requirements, have obtained state inspections (when necessary), have properly prepared the site, and have received adequate warranty protection on the home and its transportation and installation, you are ready to have your home installed on a homesite. This also requires careful attention.

Every manufacturer is required by the federal standards to provide instructions for installing your home. However, the actual installation typically is not within the manufacturer’s control. Therefore, the installation of your manufactured home is not covered by the manufacturer’s warranty. These cautions are not designed to worry you but, rather, to alert you to the importance of installation. Hundreds of thousands of manufactured homes are installed on sites each year without major problems. You should not have problems if your home is installed by a reliable retailer or by a company that specializes in manufactured-home installation. Check for damage as soon as your home is delivered, and report any problems to the retailer or transporter as soon as possible. The manufacturer’s written warranty on the home generally will not cover problems that are caused by improper installation. Usually, the retailer will install your home or will contract with a professional installation crew to do the work. In most cases, the price of your home will include the cost of installation by such qualified professionals. Be sure to check this with your retailer before you sign the sales contract. If installation is not included in the price, you may have to contract with a separate company to install your home. Ask your retailer for the names of such companies.

Clarify in writing what installation services are provided, who is providing them, and who warrants the work. The retailer should spell out, in writing, the full scope of installation services that are included in the price of your home. This should assure you that everything is covered and that there will be no misunderstandings about who is responsible for what. Regardless of whether the retailer or a separate company installs your home, you should follow several guidelines.

  • Discuss with the contractor the steps involved in installation so that you understand them.
  • Have the contractor write these steps into the contract.
  • Ask if there is a written warranty covering your home’s installation. If not, then ask to have it put in writing.

By following these guidelines, you will know exactly what you are paying for, how to check your home to see that the work has been done properly and, equally important, what kind of warranty protection covers each step. Installing your home involves six steps. The price of your home usually includes all of these steps. Therefore, ask to see an itemized list (in writing) before signing the contract to purchase your home.

1. Transporting Your Home From the Retailer’s Sales Center to Your Homesite:
The manufacturer normally is responsible for transporting the home from the factory to the retailer, and the retailer is usually responsible for getting the home to your land. However, if the roads are not adequate or there are obstacles that will make it difficult to get the home to your site, your retailer may be unable to accept responsibility for delivering your home. Be sure to check the route to your homesite for such things as low-hanging tree limbs and loose rocks.
2.  Constructing a Foundation for Home Placement:
In addition to following the manufacturer’s instructions and complying with local law, find out if the institution financing your home (or the rental community in which you place your home) has foundation requirements. The Federal Housing Administration (FHA) and Veterans Administration (VA) also have special foundation requirements. Remind your retailer about the kind of financing you are using so that all applicable foundation requirements will be met. If you place your home on your own property, you have the option of choosing from a number of different foundation types. Several types of foundations are available, from concrete slabs to full basements. Remember, local codes reflecting the different climates and soil conditions must be followed. A professional installer will know which foundation codes are required by local law or what is required by your financing institution.
3.  Leveling Your Home:
It is essential that an experienced crew installs your home to assure that it is leveled correctly. Leveling is one of the most important steps in setting up your home. It must be done according to the manufacturer’s specifications. If your home is not level on its foundation, the weight of the home will not be distributed evenly. Poor leveling could result in such problems as doors that do not open and close easily, or floors or walls that buckle. If any of these problems do occur because your home was not properly leveled, the manufacturer’s warranty will not cover the repairs. Remember that the manufacturer’s warranty only covers problems resulting from faulty construction. Insist on walking through the home before the installation crew leaves to check for signs that your home may not be level. Leveling is critical and must be performed by a professional crew. After installation has been completed and you have checked out the installed home, it is very important to periodically re-check the leveling of your home. This is important because, over time, such things as foundation supports may settle unevenly and create an un-level condition. Such conditions can, in extreme cases, cause serious damage to the walls and floors. Normally, you should re-check leveling about 60 to 90 days following installation and, perhaps, once a year after that.
4.  Securing Your Home to the Foundation:
It is not sufficient to merely place your home on a properly constructed foundation. There are certain minimum requirements that should be met. To ensure that your home does not shift and become damaged, it must be anchored to the ground, according to the manufacturer’s instructions or as required by local codes. Anchoring should prevent severe winds from damaging your home. Although your home will come with instructions for properly securing it to its foundation, anchoring is not a do-it-yourself project. Talk with your retailer about anchoring, and be sure that your home’s installation includes this very necessary step. Anchoring your home to the ground should be done by experts.
5.  Finishing Your Home:
Once your home is secured to the foundation, finishing work may be needed, such as an enclosure around the crawlspace or landscaping. If your home is a multi-section, finishing may include applying molding and joining carpet on the interior, or completing work on the exterior siding.
6.  Connecting Your Home to Utilities:

Installation services should include connecting your home to the necessary water, electrical, gas, and sewage lines. If this is not included in your installation price, you will have to contract for these services yourself. Your retailer can tell you how to make arrangements for utility connections. Alternatively, you can obtain the information from the local government agency that oversees building permits.

Inspection of Your New Manufactured Home

When you take possession of your new home, the first thing to do is to check it over thoroughly. It is important to discover problems early and report them to the retailer or the installer within the warranty’s time limits.

Installation Inspection

First, check to see that your home was installed properly. If you are present during installation, ask the installation crew manager to walk through your home with you to assist in identifying problems and to answer your questions. Open and close all interior and exterior doors. If a door does not open and close smoothly, it may indicate a need for a minor hinge adjustment, but it also may be a sign that the home is not level. Immediately call this to the attention of the person responsible for installation. Also, examine the entire house. Look at the walls, the floors, and the ceilings. Be certain that all faucets and appliances work.

General Inspection
You will want to make your inspection of the home in an organized way. A good strategy is to inspect the outside of your home first, and then check the interior, carefully going through each room. Many manufacturers provide a checklist in the owner’s manual of items you should inspect. You should fill out the checklist and return it to the manufacturer as soon as possible. As you make your inspection, jot down on paper every item you think requires service. When you are finished, make copies of the list — one for yourself, one for your retailer, and an extra copy for the manufacturer. It is also a good idea to put the date of your inspection on the list. Carefully inspect your home for any problems as soon as it is installed; make sure that it is level — check doors, windows and drawers. Remember that installation is the key to durability and the proper functioning of your home.

Choosing the Right Home Inspector

Choosing the Right Home Inspector

Buying a home? It’s probably the most expensive purchase you’ll ever make. This is no time to shop for a cheap inspection. The cost of a home inspection is very small relative to the value of the home being inspected. The additional cost of hiring an InterNACHI-Certified Professional Inspector® is almost insignificant.
You have recently been crunching the numbers, negotiating offers, adding up closing costs, shopping for mortgages, and trying to get the best deals. Don’t stop now. Don’t let your real estate agent, a “patty-cake” inspector, or anyone else talk you into skimping here.  InterNACHI-certified inspectors  perform the best inspections by far.
InterNACHI-certified inspectors earn their fees many times over. They do more, they deserve more, and — yes — they generally charge a little more. Do yourself a favor… and pay a little more for the quality inspection you deserve.

The licensing of home inspectors only sets a minimum standard. Much like being up to code, any less would be illegal.  Imaginary people, children, psychics (who claim to “sense” if a house is OK) and even pets can theoretically be home inspectors.  InterNACHI, the International Association of Certified Home Inspectors, front-ends its membership requirements.

InterNACHI inspectors:

  • have to pass InterNACHI’s Online Inspector Examination, and re-take and pass it every three years (it’s free and open to everyone, and free to re-take);
  • have to complete InterNACHI’s online Code of Ethics Course (free to take after joining, and self-paced);
  • have to take InterNACHI’s online Standards of Practice Course (free to take after joining, and self-paced);
  • must submit a signed Membership Affidavit;
  • substantially adhere to InterNACHI’s Standards of Practice;
  • abide by InterNACHI’s Code of Ethics;
  • have to submit four mock inspection reports to InterNACHI’s Report Review Committee (for free) before performing their first paid home inspection for a client if the candidate has never performed a fee-paid home inspection previously;
  • within the first year of membership, have to successfully pass the following free online, accredited, and self-paced courses and exams:
    • InterNACHI’s “Safe Practices for the Home Inspector” course,
    • InterNACHI’s “25 Standards Every Inspector Should Know” course,
    • InterNACHI’s “Residential Plumbing Overview for Inspectors” course,
    • InterNACHI’s “How to Perform Residential Electrical Inspections” course,
    • InterNACHI’s “How to Perform Roof Inspections” course,
    • InterNACHI’s “How to Inspect HVAC Systems” course,
    • InterNACHI’s “Structural Issues for Home Inspectors” course,
    • InterNACHI’s “How to Perform Exterior Inspections” course,
    • InterNACHI’s “How to Inspect the Attic, Insulation, Ventilation and Interior” course,
    • InterNACHI’s “How to Perform Deck Inspections” course,
    • InterNACHI’s “How to Inspect for Moisture Intrusion” course, and
    • InterNACHI’s “How to Inspect Fireplaces, Stoves, and Chimneys” course.
  • have to pursue inspection-related training by taking 24 hours of additional accredited Continuing Education each year;
  • have to maintain their Online Continuing Education Log (free), per InterNACHI’s rigorous Continuing Education policy;
  • have access to InterNACHI’s Message Board for exchanging information and tips with colleagues and experts;
  • have access to InterNACHI’s “What’s New” section so that they can keep up with the latest news and events in the inspection industry;
  • have access to InterNACHI’s time-tested Inspection Agreement, which keeps them (and you) away from lawsuits;
  • have access to InterNACHI’s Report Review/Mentoring Service;
  • have to carry E&O Insurance (if their state requires it);
  • have access to a real estate agent Hold-Harmless Clause;
  • and have access to many other benefits, training, marketing tools and information to help themselves, as well as consumers and real estate professionals, provided for free by the world’s largest inspector association.
So, the next time you need a home inspector (or need to refer your clients to one), make sure that inspector is a member of InterNACHI.

Choosing a Manufactured Home

Choosing a Manufactured Home

Manufactured homes no longer have to be the simple, rectangular, boxy trailer homes of the past. Depending on the size of your home site, you can choose from single-section or multi-section designs. Homes range in size from 900 to 2,500 square feet and can be customized to meet your needs and preferences.
Here are some important questions to consider when choosing your manufactured home.

What features are available?
The interior design of your home can include many of the custom features available in a conventional home. Because most manufacturers use computer-assisted design, you’ll have flexibility in choosing variations of floor plans and décor. You can also choose from a variety of exterior designs, depending on your taste and budget. Exterior siding comes in an array of colors and materials, including metal, vinyl, wood and cementitious sidings, which are virtually fireproof. Awnings, enclosures around the crawlspace, patio covers, decks and steps also are available.
How much can I expect to pay for a home?
Depending on the size, floor plans and any custom features, a new home can cost anywhere from $15,000 to more than $100,000. This price doesn’t include the property on which it sits.  Depending on the site, you may be purchasing it, leasing it or renting it.
What financing options are available?
Your retailer usually can provide information about financing. You can also check with lenders in your area. Just as there are choices when you buy a site-built home, there are a variety of financing options when you buy a manufactured home. Down payments and loan terms are similar to conventional loans (5% to 10% of the manufactured home’s sales price), and loan terms from 15 to 30 years. Most lenders offer fixed- and variable-rate loans, and most have programs that allow you to “buy the rate down.” If you own or plan to purchase the land where you will place your home, traditional mortgage financing can often be arranged.
What other costs can I expect to pay?
While your mortgage payment may be your biggest expense, you’ll have other regular and periodic payments which will vary with your circumstances. Regular expenses may include utilities, property taxes, land rental fees, insurance, routine maintenance, and other service fees, such as water and sewer. Today’s manufactured homes are built to meet new national energy standards set by HUD. The energy-conserving features found in manufactured homes help reduce monthly energy costs.
How much maintenance will my home need?
Your homeowner’s manual outlines maintenance requirements, and it’s important that you follow them. Failure to follow them could void your warranty, as well as erode the value and shorten the lifespan of your home. Additional maintenance, systems and safety information can be provided by an InterNACHI inspector during your next scheduled inspection.
 
What warranty coverage is offered on the home, its transportation, and its installation?
All manufacturers offer a written warranty that should cover:
  • structural workmanship;
  • factory-installed plumbing, heating and electrical systems;
  • factory-installed appliances, which also may be covered by separate warranty; and
  • appliance manufacturer warranties.
There are important differences among warranties. For example, manufacturer warranties usually do not cover installation (also called “set-up”) and transportation of the home, although you may be able to get this coverage through the retailer or installation contractor. Although you may never need such warranty services, it’s a good idea to check the coverage on any warranties offered before you buy.
InterNACHI-certified home inspectors know where to look for defective work. Whether you’re buying an existing home or considering a new home, allow the inspector to use his/her special knowledge to help protect you by finding defects while the home is still under warranty, and before they cause damage or injury to you or your family.
Where can I locate my home? 
Many homes are placed on privately-owned property. If this option appeals to you, find out about zoning laws, restrictive covenants, and utility connections. Your retailer can give you more information. Another option is to place your home in a land-lease community specifically designed for manufactured homes. Here, you own the home but lease the land. Placing your home in a land-lease community involves fewer siting considerations, such as utility connections. A third option is buying the home and land together in a planned subdivision where siting issues are handled by the developer.
May I move my home?
Yes, but it’s not a common scenario. The transportation of a home can place considerable stress on its structure and components. Nevertheless, if you do plan to move your home in the future, make sure you check with the appropriate state authorities about transportation and zoning regulations. States have restrictions on weight, size and width that may prevent you from moving your home. If you relocate, make sure you use a professional transporter; never try to move the home yourself. It’s also important to check the climate zone maps for your home. These maps tell you the wind, snow and thermal zones for which your home was constructed. Use them to determine whether your home is suitable for the new location you’re considering.

The actual overall costs connected with moving are another consideration. In addition to transport expenses, which include licensing fees to take your home through a state, you’ll have to pay for a new foundation, installation, and utility hook-ups.

Carbon Monoxide Poisoning and Detectors

Carbon Monoxide Poisoning and Detectors

by Nick Gromicko, CMI®


Carbon monoxide (CO) is a colorless, odorless, poisonous gas that forms from incomplete combustion of fuels, such as natural or liquefied petroleum gas, oil, wood or coal.

Facts and Figures

  • 480 U.S. residents died between 2001 and 2003 from non-fire-related carbon-monoxide poisoning.
  • Most CO exposures occur during the winter months, especially in December (including 56 deaths, and 2,157 non-fatal exposures), and in January (including 69 deaths and 2,511 non-fatal exposures). The peak time of day for CO exposure is between 6 and 10 p.m.
  • Many experts believe that CO poisoning statistics understate the problem. Because the symptoms of CO poisoning mimic a range of common health ailments, it is likely that a large number of mild to mid-level exposures are never identified, diagnosed, or accounted for in any way in carbon monoxide statistics.
  • Out of all reported non-fire carbon-monoxide incidents, 89% or almost nine out of 10 of them take place in a home.

Physiology of Carbon Monoxide Poisoning

When CO is inhaled, it displaces the oxygen that would ordinarily bind with hemoglobin, a process the effectively suffocates the body. CO can poison slowly over a period of several hours, even in low concentrations. Sensitive organs, such as the brain, heart and lungs, suffer the most from a lack of oxygen.

High concentrations of carbon monoxide can kill in less than five minutes. At low concentrations, it will require a longer period of time to affect the body. Exceeding the EPA concentration of 9 parts per million (ppm) for more than eight hours may have adverse health affects. The limit of CO exposure for healthy workers, as prescribed by the U.S. Occupational Health and Safety Administration, is 50 ppm.


Potential Sources of Carbon Monoxide

Any fuel-burning appliances which are malfunctioning or improperly installed can be a source of CO, such as:

  • furnaces;
  • stoves and ovens;
  • water heaters;
  • dryers;
  • room and space heaters;
  • fireplaces and wood stoves;
  • charcoal grills;
  • automobiles;
  • clogged chimneys or flues;
  • space heaters;
  • power tools that run on fuel;
  • gas and charcoal grills;
  • certain types of swimming pool heaters; and
  • boat engines.


PPM   % CO
in air 
Health Effects in Healthy Adults  Source/Comments 
0 0% no effects; this is the normal level in a properly operating heating appliance
35 0.0035% maximum allowable workplace exposure limit for an eight-hour work shift The National Institute for Occupational Safety and Health (NIOSH)
50 0.005% maximum allowable workplace exposure limit for an eight-hour work shift               OSHA
100 0.01% slight headache, fatigue, shortness of breath,
errors in judgment
125 0.0125% workplace alarm must sound (OSHA)
200 0.02% headache, fatigue,
nausea, dizziness
400 0.04% severe headache, fatigue, nausea, dizziness, confusion; can be life-threatening after three hours of exposure evacuate area immediately
800 0.08% convulsions, loss of consciousness;
death within three hours
evacuate area immediately
12,000 1.2% nearly instant death


CO Detector Placement
CO detectors can monitor exposure levels, but do not place them:

  • directly above or beside fuel-burning appliances, as appliances may emit a small amount of carbon monoxide upon start-up;
  • within 15 feet of heating and cooking appliances, or in or near very humid areas, such as bathrooms;
  • within 5 feet of kitchen stoves and ovens, or near areas locations where household chemicals and bleach are stored (store such chemicals away from bathrooms and kitchens, whenever possible);
  • in garages, kitchens, furnace rooms, or in any extremely dusty, dirty, humid, or greasy areas;
  • in direct sunlight, or in areas subjected to temperature extremes. These include unconditioned crawlspaces, unfinished attics, un-insulated or poorly insulated ceilings, and porches;
  • in turbulent air near ceiling fans, heat vents, air conditioners, fresh-air returns, or open windows. Blowing air may prevent carbon monoxide from reaching the CO sensors.

Do place CO detectors:

  • within 10 feet of each bedroom door and near all sleeping areas, where it can wake sleepers. The Consumer Product Safety Commission (CPSC) and Underwriters Laboratories (UL) recommend that every home have at least one carbon monoxide detector for each floor of the home, and within hearing range of each sleeping area;
  • on every floor of your home, including the basement (source:  International Association of Fire Chiefs/IAFC);
  • near or over any attached garage. Carbon monoxide detectors are affected by excessive humidity and by close proximity to gas stoves (source:  City of New York);
  • near, but not directly above, combustion appliances, such as furnaces, water heaters, and fireplaces, and in the garage (source:  UL); and
  • on the ceiling in the same room as permanently installed fuel-burning appliances, and centrally located on every habitable level, and in every HVAC zone of the building (source:  National Fire Protection Association 720). This rule applies to commercial buildings.

In North America, some national, state and local municipalities require installation of CO detectors in new and existing homes, as well as commercial businesses, among them:  Illinois, Massachusetts, Minnesota, New Jersey, Vermont and New York City, and the Canadian province of Ontario. Installers are encouraged to check with their local municipality to determine what specific requirements have been enacted in their jurisdiction.

How can I prevent CO poisoning?

  • Purchase and install carbon monoxide detectors with labels showing that they meet the requirements of the new UL standard 2034 or Comprehensive Safety Analysis 6.19 safety standards.
  • Make sure appliances are installed and operated according to the manufacturer’s instructions and local building codes. Have the heating system professionally inspected by an InterNACHI inspector and serviced annually to ensure proper operation. The inspector should also check chimneys and flues for blockages, corrosion, partial and complete disconnections, and loose connections.
  • Never service fuel-burning appliances without the proper knowledge, skill and tools. Always refer to the owner’s manual when performing minor adjustments and when servicing fuel-burning equipment.
  • Never operate a portable generator or any other gasoline engine-powered tool either in or near an enclosed space, such as a garage, house or other building. Even with open doors and windows, these spaces can trap CO and allow it to quickly build to lethal levels.
  • Never use portable fuel-burning camping equipment inside a home, garage, vehicle or tent unless it is specifically designed for use in an enclosed space and provides instructions for safe use in an enclosed area.
  • Never burn charcoal inside a home, garage, vehicle or tent.
  • Never leave a car running in an attached garage, even with the garage door open.
  • Never use gas appliances, such as ranges, ovens or clothes dryers to heat your home.
  • Never operate un-vented fuel-burning appliances in any room where people are sleeping.
  • During home renovations, ensure that appliance vents and chimneys are not blocked by tarps or debris. Make sure appliances are in proper working order when renovations are complete.
  • Do not place generators in the garage or close to the home. People lose power in their homes and get so excited about using their gas-powered generator that they don’t pay attention to where it is placed. The owner’s manual should explain how far the generator should be from the home.
  • Clean the chimney. Open the hatch at the bottom of the chimney to remove the ashes.  Hire a chimney sweep annually.
  • Check vents. Regularly inspect your home’s external vents to ensure they are not obscured by debris, dirt or snow.

In summary, carbon monoxide is a dangerous poison that can be created by various household appliances. CO detectors must be placed strategically throughout the home or business in order to alert occupants of high levels of the gas.

Building a Home

Building a Home

If you want to build a new home, there are things you need to know before you begin. Learn about construction standards and about buying land, so you know your rights.

MPS Supplementing Model Building Codes
 
The Minimum Property Standards (MPS) establish certain minimum standards for buildings constructed under HUD housing programs. This includes new single-family homes, multi-family housing and healthcare-type facilities.
HUD Minimum Property Standards and How They Supplement the Model Building Codes
Until the mid-1980s, HUD maintained separate Minimum Property Standards for different types of structures. Since that time, HUD has accepted the model building codes, including over 250 referenced standards and local building codes, in lieu of separate and prescriptive HUD standards. However, there is one major area of difference between the MPS and other model building codes — durability requirements. Homes and projects financed by FHA-insured mortgages are the collateral for these loans, and their lack of durability can increase the FHA’s financial risk in the event of default. More specifically, the model codes do not contain any minimum requirements for the durability of items such as doors, windows, gutters and downspouts, painting and wall coverings, kitchen cabinets and carpeting. The MPS includes minimum standards for these, and other items, to ensure that the value of an FHA-insured home is not reduced by the deterioration of these components.
HUD Field Office Acceptance for Areas Without Building Codes
 
HUD requires that each property insured with an FHA mortgage meet one of the nationally recognized building codes or a state or local building code based on a nationally recognized building code. In areas where such state or local codes are used, HUD determines if the state or local code is comparable to the model building code. There are also areas of the United States that do not have building codes. If no state or local building code has been adopted, the appropriate HUD Field Office will specify a building code that is comparable to one of the nationally recognized model building codes.

Interstate Land Sales

 
The Interstate Land Sales program protects consumers from fraud and abuse in the sale or lease of land. In 1968, Congress enacted the Interstate Land Sales Full Disclosure Act, which is patterned after the Securities Law of 1933, and requires land developers to register subdivisions of 100 or more non-exempt lots with HUD, and to provide each purchaser with a disclosure document called a property report. The property report contains relevant information about the subdivision and must be delivered to each purchaser before the signing of the contract or agreement.
Buying Lots from Developers

Be well informed when shopping for land. Lots may be marketed as sites for future retirement homes, for second home locations, or for recreational or campsite use. However, be wary of any investment aspect that may be stressed by sales personnel. If you plan to purchase a lot which is offered by promotional land sales, take plenty of time before coming to a decision. Before signing a purchase agreement, a contract, or a check:

  • know your rights as a buyer;
  • know something about the developer;
  • know the facts about the development and the lot you plan to buy; and
  • know what you are doing when you encounter high-pressure sales campaigns.
Generally, if the company from which you plan to buy is offering 100 or more unimproved lots for sale or lease through the mail or by means of interstate commerce, it may be required to register with the U.S. Department of Housing and Urban Development (HUD). This means that the company must file with HUD and provide prospective buyers with a property report containing detailed information about the property. Failure to do this may be a violation of federal law, punishable by up to five years in prison, a $10,000 fine, or both. The information filed by the developer and retained by HUD must contain such items as these:
  • a copy of the corporate charter and financial statement;
  • information about the land, including title policy or attorney’s title opinion, and copies of the deed and mortgages;
  • information on local ordinances, health regulations, etc.;
  • information about facilities available in the area, such as schools, hospitals and transportation systems;
  • information about availability of utilities and water, and plans for sewage disposal;
  • development plans for the property, including information on roads, streets and recreational facilities; and
  • supporting documents, such as maps, plans and letters from suppliers of water and sewer facilities.

The company filing this information must swear and affirm that it is correct and complete, and an appropriate fee must accompany submission. The information is retained by HUD and is available for public inspection. The property report, which is also prepared by the developer, goes to the buyer. The law requires the seller to give the report to a prospective lot purchaser prior to the time a purchase agreement is signed. Ask for it. The seller is also required to have the buyer sign a receipt acknowledging receipt of the property report. Do not sign the receipt unless you have actually received the property report. Check the developer’s property report before buying. This is the kind of information you will find in a property report:

  • distances to nearby communities over paved and unpaved roads;
  • existence of mortgages or liens on the property;
  • whether contract payments are placed in escrow;
  • availability and location of recreational facilities;
  • availability of sewer and water service or septic tanks and wells;
  • present and proposed utility services and charges;
  • the number of homes currently occupied;
  • soil and foundation conditions which could cause problems in construction or in using septic tanks; and
  • the type of title the buyer may receive and when it should be received.

Read the Property Report Before Signing Anything

 
This report is prepared and issued by the developer of this subdivision. It is not prepared or issued by the federal government. Federal law requires that you receive this report prior to signing a contract or agreement to buy or lease a lot in this subdivision. However, no federal agency has judged the merits or value of the property. If you received the report prior to signing a contract or agreement, you may cancel your contract or agreement by giving notice to the seller any time before midnight of the seventh day following the signing of the contract or agreement. If you did not receive this report before you signed a contract or agreement, you may cancel the contract or agreement any time within two years from the date of signing.

Your Contract Rights

 
If the lot you are buying is subject to the jurisdiction of the Interstate Land Sales Full Disclosure Act, the contract or purchase agreement must inform you of certain rights given to buyers by that Act. The contract should state that the buyer has a “cooling-off” period of seven days (or longer, if provided by state law) following the day that the contract is signed to cancel the contract, for any reason, by notice to the seller, and get his or her money back. Furthermore, unless the contract states that the seller will give the buyer a warranty deed, within 180 days after the contract is signed, the buyer has a right to cancel the contract for up to two years from the day that the contract is signed, unless the contract contains the following provisions:
  • a clear description of the lot so that the buyer may record the contract with the proper county authority;
  • the right of the buyer to a notice of any default (by the buyer), and at least 20 days after receipt of that notice to cure or remedy the default;
  • a limitation on the amount of money the seller may keep as liquidated damages, of 15% of the principal paid by the buyer (exclusive of interest) or the seller’s actual damages, whichever is greater.

Contract Rights Concerning Property Reports

It has always been the law that if the developer has an obligation to register with the Interstate Land Sales Division, the developer or sales agent must give the buyer a copy of the current property report before the buyer signs a contract. Otherwise, the buyer has up to two years to cancel the contract and get their money back. That fact must also be clearly set forth in all contracts. You may have the right to void the contract if the subdivision has not been registered with HUD, or you were not given a property report. Furthermore, if the developer has represented that it will provide or complete roads, water, sewer, gas, electricity or recreational facilities in its property report, in its advertising, or in its sales promotions, the developer must obligate itself to do so in the contract, clearly and conditionally (except for acts of nature or impossibility of performance). In addition to the right to a full disclosure of information about the lot, the prospective buyer may have the right to void the contract and receive a refund of their money if the developer has failed to register the subdivision with HUD or has failed to supply the purchaser with a property report. While a purchaser may have the right to void the contract with the developer under these conditions, the purchaser may still be liable for contract payments to a third party if that contract has been assigned to a financing institution or some similar entity. The registration is retained by HUD and is available for public inspection. If the property report contains misstatements of fact, if there are omissions, if fraudulent sales practices are used, or if other provisions of the law have been violated, the purchaser may also sue to recover damages and actual costs and expenses in court against the developer. However, depending on when your sale occurred, you may be barred from taking further action due to the Act’s statute of limitations. Your attorney can advise you further on this matter.
“Cooling-Off” Period
 
Even if you received the property report prior to the time of your signing of the contract or agreement, you have the right to revoke the contract or agreement by notice to the seller until midnight of the seventh day following the signing of the contract. You should contact the developer, preferably in writing, if you wish to revoke your contract and receive a refund of any money paid to date. Even if the property report is delivered to you before you sign a sales agreement, the law gives you a “cooling-off ” period. This right cannot be waived.
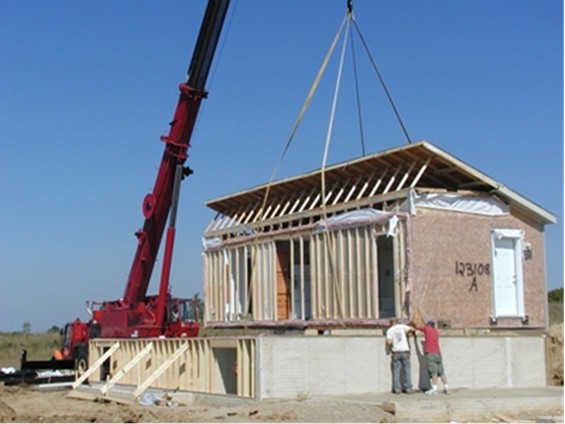
A Word About the Interstate Land Sales Division
The HUD unit which administers the law, examines the developer’s registration statement, and registers the land sales operator is the Interstate Land Sales Division. Except for disclosure purposes, this office is not concerned with zoning or land-use planning, and has no control over the quality of the subdivision. It does not dictate what land can be sold, to whom, or at what price. It cannot act as a purchaser’s attorney. But it will help purchasers secure the rights given to them by the Interstate Land Sales Full Disclosure Act. HUD is authorized by law to conduct investigations and public hearings, to subpoena witnesses and secure evidence, and to seek court injunctions to prevent violations of the law. If necessary, HUD may seek criminal indictments. HUD is authorized by law to conduct investigations and, if necessary, seek criminal indictments.
Exemptions from the Law
The prospective buyer should be aware that not all promotional land sales operations are covered by the law. If the land sales program is exempt, no registration is required by HUD, and there will be no property report. Here are some of the specific situations for which the statute allows exemptions without review by HUD, including the sale of:

  • tracts of fewer than 100 lots which are not otherwise exempt;
  • lots in a subdivision where every lot is 20 acres or more in size;
  • lots upon which a residential, commercial or industrial building has been erected, or where a sales contract obligates the seller to build one within two years;
  • certain lots which are sold only to residents of the state or metropolitan area in which the subdivision is located;
  • certain low-volume sales operations (no more than 12 lots a year);
  • certain lots that meet certain local codes and standards and are zoned for single-family residences or are limited to single-family residences by enforceable codes and restrictions; and
  • certain lots, contained in multiple sites of fewer than 100 lots each, offered pursuant to a common promotional plan.

Other exemptions are available which are not listed above. If you have reason to believe that your sale is not exempt and may still be covered by the law, contact the Interstate Land Sales Division.

Know the Developer
 
Knowing your rights under the law is the first step in making a sensible land purchase. To exercise those rights, you also must know something about the honesty and reliability of the developer who offers the subdivision that interests you. Don’t fail to ask questions. Whether you are contacted by a sales agent on the phone or by mail, at a promotional luncheon or dinner, in a sales booth at a shopping center, or in the course of your own inspection of the subdivision, make it your business to find out all you can about the company and the property. In addition, get any verbal promises or representations in writing. Don’t fail to ask questions. If you are seriously interested in buying a lot, ask if the company is registered with HUD or is entitled to an exemption. Request a copy of the property report and take the time to study it carefully and thoroughly. If you still have unanswered questions, delay any commitment until you have investigated. Discuss current prices in the area with local independent brokers. Talk to other people who have purchased lots. A local Chamber of Commerce, Better Business Bureau, or consumer protection group may have information about the seller’s reputation. Inquire through county or municipal authorities about local ordinances or regulations affecting properties similar to that which you plan to buy. Don’t be high-pressured by sales agents.
Know the Facts About the Lot
 
Once you have decided on an appealing subdivision, inspect the property. Don’t buy “sight unseen.” Better yet, hire an InterNACHI inspector to perform a thorough property inspection. Also, check the developer’s plans for the project and know what you are getting with your lot purchase. It’s a good idea to make a list of the facts you will need to know. Some of the questions you should be asking, and answering, are these:
  • How large will the development become?
  • What zoning controls are specified?
  • What amenities are promised?
  • What provision has the developer made to assure construction and maintenance?
  • What are the provisions for sewer and water service?
  • Are all of the promised facilities and utilities in the contract?
  • Will there be access roads or streets to your property, and how will they be surfaced? Who maintains them? How much will they cost?
  • Will you have clear title to the property? What liens, reservations or encumbrances exist?
  • Will you receive a deed upon purchase or a recordable sales contract?
  • What happens to your payments? Are they placed in a special escrow account to pay for the property, or are they spent at once by the developer?
  • If the developer defaults on the mortgage or goes bankrupt, could you lose your lot and investment to date to satisfy a claim against the development?
  • What happens when the developer moves out? Is there a homeowners’ association to take over community management?
  • Are there restrictions against using the lot for a campsite until you are ready to build?
  • Are there any annual maintenance fees or special assessments required of property owners?

This is a partial list of points to consider before you commit your money or your signature.
 

Know What You are Doing
Interstate land sales promotions often are conducted in a high-pressure atmosphere that sweeps unsophisticated buyers along. Before they are aware that they have made a commitment, these buyers may have signed a sales contract and started to make payments on a lot. They may be delighted with the selection made, but, if not, it may be too late for a change of mind.
Nine Dishonest Sales Practices
 
Here are some of the practices avoided by reliable sales operations. Watch out for them and exercise sales resistance if you suspect they are occurring:
1. concealing or misrepresenting facts about current and resale value. Sales agents may present general facts about the area’s population growth, industrial or residential development, and real estate price levels as if they apply to your specific lot. You may be encouraged to believe that your piece of land represents an investment which will increase in value as regional development occurs. A sales agent may tell you that the developer will re-sell the lot, if you request. This promise may not be kept. Future resale is difficult or impossible in many promotional developments because much of your purchase price — sometimes as much as 40% — has gone for an intensive advertising campaign and commissions for sales agents. You are already paying a top price and it is unlikely that anyone else would pay you more than you are paying the developer. You may even have to sell for less than the price you originally paid for the lot. Sales promotions often are conducted in a high-pressure atmosphere. Furthermore, when you attempt to sell your lot, you are in competition with the developer, who probably holds extensive, unsold acreage in the same subdivision. In most areas, real estate brokers find it impractical to undertake the sale of lots in subdivisions and will not accept such listings. It is unlikely that the lot you purchase through interstate land sales represents an investment, in the view of professional land investors. Remember, the elements of value of a piece of land are its usefulness, the supply, the demand, and the buyer’s ability to re-sell it. The Urban Land Institute estimates that land must double in value every five years to justify holding it as an investment. In some areas, the cost of holding the land, such as taxes and other assessments, can run as high as 11% a year.
2. failure to honor refund promises or agreements. Some sales promotions conducted by mail, email or long-distance telephone include the offer of a refund if the property has been misrepresented, or if the customer inspects the land within a certain period of time and decides not to buy. When the customers request the refund, s/he may encounter arguments about the terms of the agreement. The company may even accuse its own agent of having made a money-back guarantee without the consent or knowledge of the developer. Sometimes, the promised refund is made, but only after a long delay.
3. misrepresentation of facts about the subdivision. This is where the property report offers an added measure of protection. A sales agent may offer false or incomplete information relating to either a distant subdivision or one which you visit. Misrepresentations often relate to matters such as the legal title, claims against it, latent dangers (such as swamps or cliffs), unusual physical features (such as poor drainage), restrictions on use, or lack of necessary facilities and utilities. Read the property report carefully with an eye to omissions, generalizations, or unproved statements that may tend to mislead you. If you are concerned about overlooking something important, discuss the report and the contract with a lawyer who understands real estate matters. The developer also may use advertisements that imply that certain facilities and amenities are currently available when they are not. Read the property report to determine whether these facilities and amenities are actually completed, or proposed to be completed in the future. If the company advertises sales on credit terms, the Truth in Lending Act requires the sales contract to fully set forth all terms of financing. This information must include total cost, simple annual interest, and total finance charges.
4. failure to develop the subdivision as planned. Many buyers rely upon the developer’s contractual agreement or a verbal promise to develop the subdivision in a certain way. The promised attractions that influenced your purchase (golf course, marina, swimming pool, etc.) may never materialize after you become an owner. If they are provided, it may be only after a long delay. If you are planning on immediate vacation use of the property, or are working toward a specific retirement date, you may find that the special features promised of the development are not available when you need them.
5. failure to deliver deeds and/or title insurance policies. Documents relating to the sales transaction may not be delivered as promised. Some sales in the promotional land development industry are made by contract for a deed to be delivered when the purchaser makes the last payment under the terms of the contract. A dishonest developer may fail to deliver the deed, or deliver it only after a long delay. A sales agent may offer false or incomplete information.
6. abusive treatment and high-pressure sales tactics. Some sales agents drive prospective customers around a subdivision in automobiles equipped with citizen band radios which provide a running commentary on lot sales in progress. The customer may be misled by this and other sales techniques to believe that desirable lots are selling rapidly and that a hurried choice must be made. Hurrying the buyers into a purchase they may later regret is only one ploy of high-pressure sales agents. More offensive is abusive language used to embarrass customers who delay an immediate decision to buy. In some instances, hesitant buyers have been isolated in remote or unfamiliar places where transportation is controlled by the sales agent or the agent’s organization.
7. failure to make good on sales inducements. Free vacations, gifts, savings bonds, trading stamps, and other promised inducements are used to lure people to sales presentations or to development sites. These promised treats may never materialize. Sometimes, special conditions are attached to the lure, or a customer is advised that gifts go only to lot purchasers. A “free vacation” may be the means of delivering the prospective buyer to a battery of high-pressure sales agents in a distant place. The promised attractions may never materialize.
8. “bait and switch” tactics. Lots are frequently advertised at extremely low prices. When prospective buyers appear, they are told that the low-priced lots are all sold and then are pressured to buy one that is much more expensive. If the cheaper lot is available, it may be located on the side of a cliff or in another inaccessible location. If accessible, it may be much too small for a building or have other undesirable features. The buyers may be lured to the property with a certificate entitling them to a “free” lot. Often, the certificate bears a face value of $500 to $1,000. If the buyers attempt to cash it in, the amount is simply included in the regular price (often inflated) of the lot they choose. Often, this so-called “bait and switch” technique has a delayed fuse. Buyers who purchase an unseen lot for later retirement may be unpleasantly surprised when they visit the development. The lot they have paid for may be remote from other homes, shopping and medical facilities. It may be insufficiently developed for use. When the buyers complain, sales personnel attempt to switch them to a more expensive lot, applying the money paid for the original lot to an inflated price for the new one, and tacking on additional financing charges. If the unhappy purchasers lack sufficient funds to accept this alternative, they are left with an unusable, unmarketable first choice.
9. failure to grant rights under the Interstate Land Sales Full Disclosure Act. Purchasers may not be given copies of the property report before they sign a sales contract. Some sales agents withhold this detailed statement until customers choose a specific lot. Sometimes, the buyers receive the report in a mass of promotional materials and legal documents. Unaware that the report is in their possession, they fail to read and understand it before signing a sales contract.

Basic Waterproofing for Basements

Basic Waterproofing for Basements

by Nick Gromicko, CMI®
Water Damage Concerns

Basements are typically the area of a structure most at risk for water damage because they are located below grade and surrounded by soil.  Soil releases water it has absorbed during rain or when snow melts, and the water can end up in the basement through leaks or cracks.  Water can even migrate through solid concrete walls via capillary action, which is a phenomenon whereby liquid spontaneously rises in a narrow space, such as a thin tube, or via porous materials.  Wet basements can cause problems that include peeling paint, toxic mold contamination, building rot, foundation collapse, and termite damage.  Even interior air quality can be affected if naturally occurring gasses released by the soil are being transmitted into the basement.

Properly waterproofing a basement will lessen the risk of damage caused by moisture or water.  Homeowners will want to be aware of what they can do to keep their basements dry and safe from damage.  Inspectors can also benefit from being aware of these basic strategies for preventing leaks and floods.

Prevent water entry by diverting it away from the foundation.

Preventing water from entering the basement by ensuring it is diverted away from the foundation is of primary concern.  Poor roof drainage and surface runoff due to gutter defects and improper site grading may be the most common causes of wet basements.  Addressing these issues will go a long way toward ensuring that water does not penetrate the basement.
Here are some measures to divert water away from the foundation:
  • Install and maintain gutters and downspouts so that they route all rainwater and snow melt far enough away from the foundation of the building to ensure that pooling does not occur near the walls of the structure.  At least 10 feet from the building is best, and at the point where water leaves the downspout, it should be able to flow freely away from the foundation instead of back toward it, and should not be collecting in pools.
  • The finish grade should be sloped away from the building for 10 to 15 feet.  Low spots that may lead to water pooling should be evened out to prevent the possibility of standing water near the foundation.
  • Shallow ditches called swales should be used in conditions where one or more sides of the building face an upward slope.  
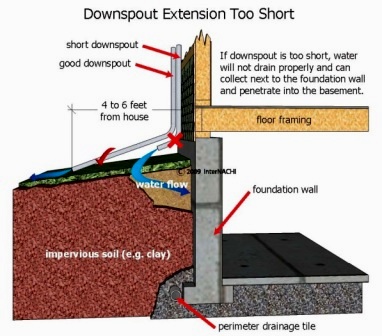
A swale should slope away from the building for 10 to 15 feet, at which point it can empty into another swale that directs water around to the downhill-side of the building, leading it away from the foundation.


Repair all cracks and holes.
If leaks or seepage is occurring in the basement’s interior, water and moisture are most likely entering through small cracks or holes.  The cracks or holes could be the result of several things.  Poor workmanship during the original build may be making itself apparent in the form of cracks or holes.  Water pressure from the outside may be building up, forcing water through walls.  The house may have settled, causing cracks in the floor or walls.  Repairing all cracks and small holes will help prevent leaks and floods.
Here are some steps to take if you suspect that water is entering the basement through cracks or holes:
  • Identify areas where water may be entering through cracks or holes by checking for moisture, leaking or discoloration.  Every square inch of the basement should be examined, especially in cases where leaking or flooding has not been obvious, but moisture buildup is readily apparent.
  • A mixture of epoxy and latex cement can be used to fill small hairline cracks and holes.  This is a waterproof formula that can help ensure that moisture and water do not penetrate basement walls.  It is effective primarily for very small cracks and holes.
  • Any cracks larger than about 1/8-inch should be filled with mortar made from one part cement and two parts fine sand, with just enough water to make a fairly stiff mortar.  It should be pressed firmly into all parts of the larger cracks and holes to be sure that no air bubbles or pockets remain.  As long as water is not being forced through basement walls due to outside pressure, the application of mortar with a standard trowel will be sufficient if special care is taken to fill all cracks completely.
  • If water is being forced through by outside pressure, a slightly different method of patching with mortar can be used.  Surface areas of walls or floors with cracks should first be chiseled out a bit at the mouth of the crack and all along its length.  Using a chipping chisel and hammer or a cold chisel, cut a dovetail groove along the mouth of each crack to be filled, and then apply the mortar thoroughly.  The dovetail groove, once filled, should be strong enough to resist the force of pressure that was pushing water through the crack.

Apply sodium-silicate sealant to the walls and floor.

Once all runoff has been thoroughly diverted away from the foundation, and all cracks and holes have been repaired and no leaking is occurring, a waterproof sealant can be applied as a final measure.

Sodium silicate is a water-based mixture that will actually penetrate the substrate by up to 4 inches.  Concrete, concrete block and masonry have lime as a natural component of their composition, which reacts with the sodium silicate to produce a solid, crystalline structure which fills in all the microscopic cracks, holes and pores of the substrate.  No water vapor or gas will be able penetrate via capillary action because the concrete and masonry have now become harder and denser from the sodium silicate.
Here are some steps and tips for its application:
  • Special care should be taken when applying sodium silicate.  It is an alkaline substance and, as such, can burn skin and eyes if it comes into contact with them.  Inhalation can also cause irritation to the respiratory tract.

  • Sodium silicate must be applied only to bare concrete, concrete block or masonry that has been cleaned thoroughly and is free of any dirt, oil, adhesives, paint and grease.  This will ensure that it penetrates the substrate properly and fills in all microscopic cracks.  It can be applied using a garden sprayer, roller or brush to a surface that has first been lightly dampened with a mop or brush.  Apply two to three coats to the concrete, waiting 10 to 20 minutes between each application.  Concrete block and masonry will take three to four coats, with the same 10 to 20 minutes between applications.  Any excess should then be wiped away.  Sodium silicate should not be over-applied or it will not be completely absorbed by the substrate, leaving a white residue.
  • Paint can then be applied without fear of water vapor getting trapped between the paint and the wall, which could eventually cause blistering and peeling.  Adhesives for tile or floor covering can also be used more effectively, once the substrate has been sealed.
Diverting water away from foundations so that it does not collect outside basement walls and floors is a key element in preventing flooding and water damage.  Ensuring that any water that does end up near basement exteriors cannot enter through holes or cracks is also important, and sealing with a waterproof compound will help prevent water vapor or gas from penetrating, as well.  By following these procedures, the risk of water-related issues in basement interiors can be greatly reduced, protecting the building from damage such as foundation rotting, mold growth, and peeling paint, as well as improving the interior air quality by blocking the transmission of gasses from the soil outside.

Barbeque Safety

Barbeque Safety

by Nick Gromicko, CMI®
With barbecue season already here, homeowners should heed the following safety precautions in order to keep their families and property safe.
  • Propane grills present an enormous fire hazard, as the Consumer Product Safety Commission (CPSC) is aware of more than 500 fires that result annually from their misuse or malfunction. The following precautions are recommended specifically when using propane grills:
    • Store propane tanks outdoors and never near the grill or any other heat source. In addition, never store or transport them in your car’s trunk.
    • Make sure to completely turn off the gas after you have finished, or when you are changing the tank. Even a small gas leak can cause a deadly explosion.
    • Check for damage to a tank before refilling it, and only buy propane from reputable suppliers.
    • Never use a propane barbecue grill on a terrace, balcony or roof, as this is dangerous and illegal.
    • No more than two 20-pound propane tanks are allowed on the property of a one- or two-family home.
    • To inspect for a leak, spray a soapy solution over the connections and watch for bubbles. If you see evidence of a leak, reconnect the components and try again. If bubbles persist, replace the leaking parts before using the grill.
    • Make sure connections are secure before turning on the gas, especially if the grill hasn’t been used in months. The most dangerous time to use a propane grill is at the beginning of the barbecue season.
    • Ignite a propane grill with the lid open, not closed. Propane can accumulate beneath a closed lid and explode.
    • When finished, turn off the gas first, and then the controls. This way, residual gas in the pipe will be used up.
  • Charcoal grills pose a serious poisoning threat due to the venting of carbon monoxide (CO). The CPSC estimates that 20 people die annually from accidentally ingesting CO from charcoal grills. These grills can also be a potential fire hazard. Follow these precautions when using charcoal grills:
    • Never use a charcoal grill indoors, even if the area is ventilated. CO is colorless and odorless, and you will not know you are in danger until it is too late.
    • Use only barbeque starter fluid to start the grill, and don’t add the fluid to an open flame. It is possible for the flame to follow the fluid’s path back to the container as you’re holding it.
    • Let the fluid soak into the coals for a minute before igniting them to allow explosive vapors to dissipate.
    • Charcoal grills are permitted on terraces and balconies only if there is at least 10 feet of clearance from the building, and a water source immediately nearby, such as a hose (or 4 gallons of water).
    • Be careful not to spill any fluid on yourself, and stand back when igniting the grill. Keep the charcoal lighter fluid container at a safe distance from the grill.
    • When cleaning the grill, dispose of the ashes in a metal container with a tight lid, and add water. Do not remove the ashes until they have fully cooled.
    • Fill the base of the grill with charcoal to a depth of no more than 2 inches.
  • Electric grillsare probably safer than propane and charcoal grills, but safety precautions need to be used with them as well. Follow these tips when using electric grills:
    • Do not use lighter fluid or any other combustible materials.
    • When using an extension cord, make sure it is rated for the amperage required by the grill. The cord should be unplugged when not in use, and out of a busy foot path to prevent tripping.
    • As always, follow the manufacturer’s instructions.
Safety Recommendations for General Grill Use
  • Always make sure that the grill is used in a safe place, where kids and pets won’t touch or bump into it. Keep in mind that the grill will still be hot after you finish cooking, and anyone coming into contact with it could be burned.
  • If you use a grill lighter, make sure you don’t leave it lying around where children can reach it. They will quickly learn how to use it.
  • Never leave the grill unattended, as this is generally when accidents happen.
  • Keep a fire extinguisher or garden hose nearby.
  • Ensure that the grill is completely cooled before moving it or placing it back in storage.
  • Ensure that the grill is only used on a flat surface that cannot burn, and well away from any shed, trees or shrubs.
  • Clean out the grease and other debris in the grill periodically. Be sure to look for rust or other signs of deterioration.
  • Don’t wear loose clothing that might catch fire while you’re cooking.
  • Use long-handled barbecue tools and flame-resistant oven mitts.
  • Keep alcoholic beverages away from the grill; they are flammable!
In summary, homeowners should exercise caution when using any kind of grill, as they can harm life and property in numerous ways.

15 Tools Every Homeowner Should Own

15 Tools Every Homeowner Should Own

by Nick Gromicko, CMI® and Ben Gromicko
The following items are essential tools, but this list is by no means exhaustive. Feel free to ask an InterNACHI inspector during your next inspection about other tools that you might find useful.
 Standard plunger
1.  Plunger
A clogged sink or toilet is one of the most inconvenient household problems that you will face. With a plunger on hand, however, you can usually remedy these plumbing issues relatively quickly. It is best to have two plungers — one for the sink and one for the toilet.


2.  Combination Wrench Set

One end of a combination wrench set is open and the other end is a closed loop. Nuts and bolts are manufactured in standard and metric sizes, and because both varieties are widely used, you’ll need both sets of wrenches. For the most control and leverage, always pull the wrench toward you, instead of pushing on it. Also, avoid over-tightening.

3.  Slip-Joint Pliers

Use slip-joint pliers to grab hold of a nail, a nut, a bolt, and much more. These types of pliers are versatile because of the jaws, which feature both flat and curved areas for gripping many types of objects. There is also a built-in slip-joint, which allows the user to quickly adjust the jaw size to suit most tasks.

4.  Adjustable Wrench

Adjustable wrenches are somewhat awkward to use and can damage a bolt or nut if they are not handled properly. However, adjustable wrenches are ideal for situations where you need two wrenches of the same size. Screw the jaws all the way closed to avoid damaging the bolt or nut.

Caulking gun

5.  Caulking Gun
Caulking is the process of sealing up cracks and gaps in various structures and certain types of piping. Caulking can provide noise mitigation and thermal insulation, and control water penetration. Caulk should be applied only to areas that are clean and dry.
6.  Flashlight
None of the tools in this list is of any use if you cannot visually inspect the situation. The problem, and solution, are apparent only with a good flashlight. A traditional two-battery flashlight is usually sufficient, as larger flashlights may be too unwieldy.
7.  Tape Measure
Measuring house projects requires a tape measure — not a ruler or a yardstick. Tape measures come in many lengths, although 25 feet is best.  Measure everything at least twice to ensure accuracy.

8.  Hacksaw
A hacksaw is useful for cutting metal objects, such as pipes, bolts and brackets. Hacksaws look thin and flimsy, but they’ll easily cut through even the hardest of metals. Blades are replaceable, so focus your purchase on a quality hacksaw frame.

9. Torpedo LevelTorpedo level
Only a level can be used to determine if something, such as a shelf, appliance or picture, is correctly oriented. The torpedo-style level is unique because it not only shows when an object is perfectly horizontal or vertical, but it also has a gauge that shows when an object is at a 45-degree angle. The bubble in the viewfinder must be exactly in the middle — not merely close.

10.  Safety Glasses / Goggles
For all tasks involving a hammer or a power tool, you should always wear safety glasses or goggles. They should also be worn while you mix chemicals.

11.  Claw Hammer
A good hammer is one of the most important tools you can own.  Use it to drive and remove nails, to pry wood loose from the house, and in combination with other tools. They come in a variety of sizes, although a 16-ounce hammer is the best all-purpose choice.

12.  Screwdriver Set
It is best to have four screwdrivers: a small and large version of both a flathead and a Phillips-head screwdriver. Electrical screwdrivers areWire cutter sometimes convenient, but they’re no substitute.  Manual screwdrivers can reach into more places and they are less likely to damage the screw.

13.  Wire Cutters
Wire cutters are pliers designed to cut wires and small nails. The side-cutting style (unlike the stronger end-cutting style) is handy, but not strong enough to cut small nails.

14.  Respirator / Safety Mask
While paints and other coatings are now manufactured to be less toxic (and lead-free) than in previous decades, most still contain dangerous chemicals, which is why you should wear a mask to avoid accidentally inhaling. A mask should also be worn when working in dusty and dirty environments. Disposable masks usually come in packs of 10 and should be thrown away after use. Full and half-face respirators can be used to prevent the inhalation of very fine particles that ordinary facemasks will not stop.

15.  Duct Tape
This tape is extremely strong and adaptable. Originally, it was widely used to make temporary repairs to many types of military equipment. Today, it’s one of the key items specified for home emergency kits because it is water-resistant and extremely sticky.
  • « Go to Previous Page
  • Page 1
  • Page 2
  • Page 3
  • Go to Next Page »

Primary Sidebar

Contact Info

Armstrong Home Inspection Service, LLC
Saginaw, MN 55779
(218) 390-2166

armstronghomeinspectionsvc@gmail.com

About Us

Armstrong Home Inspection Service is certified for virtually all types of home inspections, and we use the latest technology including infrared thermal imaging. We offer Manufactured Home Engineer Certifications. We are a licensed and certified radon measurement professional. We also offer water quality testing.

Whether you are a buyer, seller, lender, or real estate agent, you can trust Armstrong for thorough home inspections at reasonable prices.

Footer

Armstrong Home Inspection Service, LLC

  • Mark Armstrong
  • armstronghomeinspectionsvc@gmail.com
  • (218)390-2166
  • Duluth/Saginaw MN
  • Hours: M-F 7am-7pm & Sat 7am-5pm


Proudly Serving

St Louis, Carlton, and Northern Pine Counties including Duluth, Hermantown, Proctor, Esko, Cloquet, Saginaw, Lakewood, Two Harbors, Rice Lake, Island Lake, Canyon, Cotton, Meadowlands, Hibbing, Chisholm, Virginia, Eveleth, Gilbert, Biwabik, Aurora, Hoyt Lakes, Carlton, Wrenshall, Mahtowa, Barnum, Moose Lake, Sturgeon Lake, Willow River, Sandstone, Brookston, Floodwood, Cromwell, Mcgregor, and Surrounding Areas.

Social Media

YouTube link

Facebook logo

Copyright © 2025 Armstrong Home Inspection Service, LLC. All rights reserved.

  • Home
  • About
  • Services
  • Pricing
  • Sample Reports
  • Contact Us
  • Blog
  • Schedule Inspection