• Skip to primary navigation
  • Skip to main content
  • Skip to primary sidebar
  • Skip to footer

Armstrong Home Inspection Service, LLC

Home Inspector or Home Inspection

  • Home
  • About
  • Services
    • Buyers Pre-Purchase Home Inspection
    • Sellers Pre-Listing Home Inspection
    • Manufactured Home Engineers Foundation Certification
    • “Quick Look “Walk Through Home Consultation
    • Radon Testing
    • Water Quality Testing
    • Infrared Thermal Imaging
  • Pricing
  • Sample Reports
  • Contact Us
  • Blog
    • 10 Easy Ways to Save Money and Energy in Your Home
      • Helpful Tips for First-Time Home Buyers
      • Making Your Home Burglar-Resistant
      • Manufactured Housing and Standards
      • Modular vs. Manufactured Homes
      • Moisture Intrusion
      • Mold, Moisture, and Your Home
      • Non-Conforming Bedrooms
      • Permanent Wood Foundations
      • Radon
      • Tie-Downs for Manufactured Homes
      • Water Quality
    • 15 Tools Every Homeowner Should Own
    • Barbeque Safety
    • Basic Waterproofing for Basements
    • Building a Home
    • Carbon Monoxide Poisoning and Detectors
    • Changing the HVAC filter
    • Choosing a Manufactured Home
    • Choosing the Right Home Inspector
    • Electrical Safety
    • Geothermal Heating and Cooling Systems
    • Ground-Fault Circuit Interrupters (GFCIs)
  • Schedule Inspection

Permanent Wood Foundations

Permanent Wood Foundations

by Nick Gromicko, CMI® and Kenton Shepard

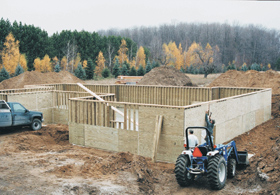
While traditional basement walls are made from masonry materials such as concrete or stone, inspectors should be prepared to encounter permanent wood foundations (PWFs).  When pressure-treated wood was developed in the 1960s, it became possible for wood to be used in foundation walls without being prohibitively vulnerable to damage from insects and moisture, and by the 1970s, PWFs gained acceptance.
Some builders and manufacturers claim that wood foundations offer a number of advantages over masonry foundations, such as:
  • Wood foundations are simpler, quicker and cheaper to construct than masonry foundations. On average, they will not, however, last as long as masonry foundations and are less durable in the long-term.
  • The design of PWFs requires that dry soil is maintained around the foundation. This means that a properly maintained and constructed basement with wood walls will be dry and mildew-free. Basement mildew, leakage and dampness are common in houses with masonry foundations.
  • Finishing a basement is easier when walls are made from wood. Insulation is placed between the wall studs to which drywall can be attached.
  • The basement will be warmer because wood is a better insulator than masonry, and the foundation wall studs provide large cavities for insulation. However, it must be considered that wood foundation walls are typically much thinner than masonry walls. Also, masonry can be insulated.
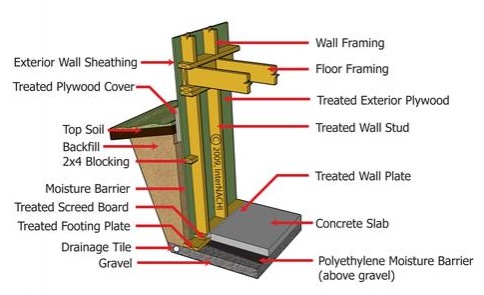
Inspectors can check for the following indicators that wood basement walls are experiencing problems:
  • dampness. If dampness is present, its source should be identified. Dampness may be due to a rising water table, an inadequate drainage system, or inadequate damp-proofing. Water from an interior source, such as an air conditioner or a high-efficiency furnace, however, does not indicate a compromised PWF.
  • exterior wood decay. Inspectors can check for exterior wood decay by probing the wall from the outside with a rod. It is usually adequate to probe once every 8 feet. If decayed wood is detected by probing, it is likely that decay exists elsewhere in the wall.
  • interior wood decay. If the interior wall is not covered by drywall, it may be possible to inspect for wood decay below grade from the inside of the house.
  • foundation leakage. Evidence of foundation leakage may be discovered at butt joints where sealant may not have been used.
  • buckling. Buckling can occur due to constant pressure over the course of years, or by the back-filling process.
  • lack of a moisture barrier. Outside, a moisture barrier should be present and it should rise above grade.
  • bowing of the foundation walls, especially the wall next to the basement stairs.
Damp-Proofing
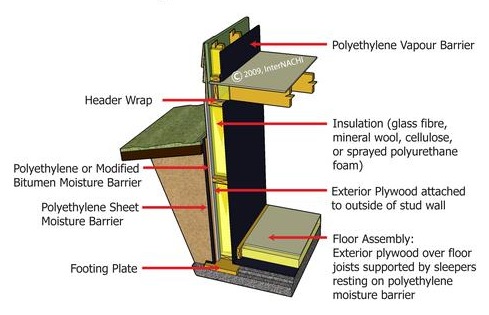
As addressed above, PWFs rely upon adequate damp-proofing. Inspectors can refer to the 2006 International Residential Code (IRC) for specifics regarding this subject:

Plywood panel joints in the foundation walls shall be sealed full length with a caulking compound capable of producing a moisture-proof seal under the conditions of temperature and moisture content at which it will be applied and used.

A 6-mil-thick (0.15 mm) polyethylene film shall be applied over the below-grade portion of exterior foundation walls prior to backfilling. Joints in the polyethylene film shall be lapped 6 inches (152 mm) and sealed with adhesive. The top ledge of the polyethylene film shall be bonded to the sheathing to form a seal. Film areas at grade shall be protected from mechanical damage and exposure by a pressure preservatively treated lumber or plywood strip attached to the wall several inches above finish-grade level and extending approximately 9 inches (229 mm) below grade. The joint between the strip and the wall shall be caulked full length prior to fastening the strip to the wall. Other coverings appropriate to the architectural treatment may also be used. The polyethylene film shall extend down to the bottom of the wood footing plate but shall not overlap or extend into the gravel or crushed stone footing.

In summary, permanent wood foundations are relatively new and rare, but InterNACHI inspectors should know the defects that are commonly associated with them.

Non-Conforming Bedrooms

Non-Conforming Bedrooms

by Nick Gromicko, CMI®


A room must conform to specific requirements in order for it to be considered a bedroom or sleeping room. The reason for this law is that the inhabitant must be able to quickly escape in case of fire or another emergency.

Why would a homeowner use a non-conforming room as a bedroom?Non-conforming window  Some of the reasons include:
  • to earn money from it as a rental. While they run the risk of being discovered by the city, landlords will profit by renting out rooms that are not legally bedrooms;
  • to increase the value of the home. All other considerations being equal, a four-bedroom house will usually sell for more than a three-bedroom house; and
  • lack of knowledge of code requirements. To the untrained eye, there is little obvious difference between a conforming bedroom and non-conforming bedroom. When an emergency happens, however, the difference will be more apparent. If you have any questions about safety requirements, ask your InterNACHI inspector during your next scheduled inspection.

Homeowners run serious risks when they use a non-conforming room as a bedroom. An embittered tenant, for instance, may bring their landlord to court, especially if the tenant was forced out when the faux bedroom was exposed. The landlord, upon being exposed, might choose to adjust the bedroom to make it code-compliant, but this can cost thousands of dollars. Landlords can also be sued if they sell the home after having advertised it as having more bedrooms than it actually has. And the owner might pay more than they should be paying in property tax if they incorrectly list a non-conforming bedroom as a bedroom. Perhaps the greatest risk posed by rooms that unlawfully serve as bedrooms stems from the reason these laws exist in the first place:  rooms lacking egress can be deadly in case of an emergency. For instance, on January 5, 2002, four family members sleeping in the basement of a Gaithersburg, Maryland, townhome were killed by a blaze when they had no easy escape.

The following requirements are taken from the 2006 International Residential Code (IRC), and they can be used as a general guide, but bear in mind that the local municipality determines the legal definition of a bedroom. Such local regulations can vary widely among municipalities, and what qualifies as a bedroom in one city might be more properly called a den in a nearby city. In some municipalities, the room must be above grade, be equipped with an AFCI or smoke alarm to be considered a conforming bedroom, for instance. Ceiling height and natural lighting might also be factors. The issue can be extremely complex, so it’s best to learn the code requirements for your area. Nevertheless, the IRC can be useful, and it reads as follows:

  • EMERGENCY ESCAPE AND RESCUE REQUIRED SECTION: R 310.1 Basements and every sleeping room shall have at least one operable emergency and rescue opening. Such opening shall open directly into a public street, public alley, yard or court. Where basements contain one or more sleeping rooms, emergency egress and rescue openings shall be required in each sleeping room, but shall not be required in adjoining areas of the basement. Where emergency escape and rescue openings are provided, they shall have a sill height of not more than 44 inches (1,118mm) above the floor. Where a door opening having a threshold below the adjacent ground elevation serves as an emergency escape and rescue opening and is provided with a bulkhead enclosure, the bulkhead enclosure shall comply with SECTION R310.3. The net clear opening dimensions required by this section shall be obtained by the normal operation of the emergency escape and rescue opening from the inside. Emergency escape and rescue openings with a finished sill height below the adjacent ground elevation shall be provided with a window well, in accordance with SECTION R310.2.  
    • MINIMUM OPENING AREA: SECTION: R 310.1.1 All emergency escape and rescue openings shall have a minimum net clear opening of 5.7 square feet (0.530 m2). Exception: Grade floor openings shall have a minimum net clear opening of 5 square feet (0.465 m2).
    • MINIMUM OPENING HEIGHT: R 310.1.2 The minimum net clear opening height shall be 24 inches (610mm).
    • MINIMUM OPENING WIDTH: R 310.1.3 The minimum net clear opening width shall be 20 inches (508mm).
    • OPERATIONAL CONSTRAINTS: R 310.1.4 Emergency escape and rescue openings shall be operational from the inside of the room without the use of keys or tools or special knowledge.

  • WINDOW WELLS: SECTION: R310.2 The minimum horizontal area of the window well shall be 9 square feet (0.9 m2), with a minimum horizontal projection and width of 36 inches (914mm). The area of the window well shall allow the emergency escape and rescue opening to be fully opened. Exception: The ladder or steps required by SECTION R 310.2.1 shall be permitted to encroach a maximum of 6 inches (152mm) into the required dimensions of the window well.
  • LADDER AND STEPS: SECTION: R 310.2.1 Window wells with a vertical depth greater than 44 inches (1,118mm) shall be equipped with a permanently affixed ladder or steps usable with the window in the fully open position. Ladders or steps required by this section shall not be required to comply with SECTIONS R311.5 and R311.6. Ladders or rungs shall have an inside width of at least 12 inches (305 mm), shall project at least 3 inches (76mm) from the wall, and shall be spaced not more than 18 inches (457mm) on-center vertically for the full height of the window well.
  • BULKHEAD ENCLOSURES: SECTION: R 310.3 Bulkhead enclosures shall provide direct access to the basement. The bulkhead enclosure with the door panels in the fully open position shall provide the minimum net clear opening required by SECTION R 310.1.1. Bulkhead enclosures shall also comply with SECTION R 311.5.8.2.
  • BARS, GRILLS, COVERS, AND SCREENS: SECTION: R 310.3 Bars, grilles, covers, screens or similar devices are permitted to be placed over emergency escape and rescue openings, bulkhead enclosures, or window wells that serve such openings, provided the minimum net clear opening size complies with SECTIONS R 310.1.1 to R 310.1.3, and such devices shall be releasable or removable from the inside without the use of a key, tool, special knowledge, or force greater than that which is required for normal operation of the escape and rescue opening.
  • EMERGENCY ESCAPE WINDOWS UNDER DECKS AND PORCHES: SECTION: R 310.5 Emergency escape windows are allowed to be installed under decks and porches, provided the location of the deck allows the emergency escape window to be fully opened and provides a path not less than 36 inches (914 mm) in height to a yard or court.
In summary, non-conforming bedrooms are rooms that unlawfully serve as bedrooms, as the occupant would lack an easy escape in case of emergency.

Mold, Moisture, and Your Home

Mold, Moisture and Your Home

  
Mold Basics
  • The key to mold control is moisture control.
  • If mold is a problem in your home, you should clean up the mold promptly and fix the water problem.
  • It is important to dry water-damaged areas and items within 24 to 48 hours to prevent mold growth.

Why is mold growing in my home?

Molds are part of the natural environment. Outdoors, molds play a part in nature by breaking down dead organic matter, such as fallen leaves and dead trees. But indoors, mold growth should be avoided.  Molds reproduce by means of tiny spores; the spores are invisible to the naked eye and float through outdoor and indoor air. Mold may begin growing indoors when mold spores land on surfaces that are wet.  There are many types of mold, and none of them will grow without water or moisture.
 
Can mold cause health problems?

Molds are usually not a problem indoors, unless mold spores land on a wet or damp spot and begin growing.  Molds have the potential to cause health problems.  Molds produce allergens (substances that can cause allergic reactions), irritants and, in some cases, potentially toxic substances (mycotoxins).  Inhaling or touching mold or mold spores may cause allergic reactions in sensitive individuals.  Allergic responses include hay fever-type symptoms, such as sneezing, runny nose, red eyes, and skin rash (dermatitis).  Allergic reactions to mold are common.  They can be immediate or delayed.  Molds can also cause asthma attacks in people with asthma who are allergic to mold.  In addition, mold exposure can irritate the eyes, skin, nose, throat and lungs of both mold-allergic and non-allergic people.  Symptoms other than the allergic and irritant types are not commonly reported as a result of inhaling mold.  Research on mold and health effects is ongoing.  This article provides a brief overview; it does not describe all potential health effects related to mold exposure.  For more detailed information, consult a health professional.  You may also wish to consult your state or local health department.

How do I get rid of mold? 

It is impossible to get rid of all mold and mold spores indoors.  Some mold spores will be found floating through the air and in house dust. Mold spores will not grow if moisture is not present.  Indoor mold growth can and should be prevented or controlled by controlling moisture indoors. If there is mold growth in your home, you must clean up the mold and fix the water problem. If you clean up the mold but don’t fix the water problem, then, most likely, the mold problem will recur.
Who should do the cleanup?
This depends on a number of factors.  One consideration is the size of the mold problem.  If the moldy area is less than about 10 square feet (less than roughly a 3-foot by 3-foot patch), in most cases, you can handle the job yourself, following the guidelines below.
  • If there has been a lot of water damage, and/or mold growth covers more than 10 square feet, consult with an InterNACHI inspector.
  • If you choose to hire a contractor (or other professional service provider) to do the cleanup, make sure the contractor has experience cleaning up mold.  Check references and ask the contractor to follow the recommendations of the EPA, the guidelines of the American Conference of Governmental Industrial Hygenists (ACGIH), or other guidelines from professional or government organizations.
  • Do not run the HVAC system if you know or suspect that it is contaminated with mold.  This could spread mold throughout the building.
  • If the water and/or mold damage was caused by sewage or other contaminated water, then call in a professional who has experience cleaning and fixing buildings damaged by contaminated water.
  • If you have health concerns, consult a health professional before starting cleanup.

Tips and Techniques

The tips and techniques presented in this section will help you clean up your mold problem.  Professional cleaners or remediators may use methods not covered here.  Please note that mold may cause staining and cosmetic damage.  It may not be possible to clean an item so that its original appearance is restored.   

  • Fix plumbing leaks and other water problems as soon as possible. Dry all items completely.
  • Scrub mold off hard surfaces with detergent and water, and dry completely.
  • Absorbent or porous materials, such as ceiling tiles and carpet, may have to be thrown away if they become moldy. Mold can grow on or fill in the empty spaces and crevices of porous materials, so the mold may be difficult or impossible to remove completely.
  • Avoid exposing yourself or others to mold.
  • Do not paint or caulk moldy surfaces.
  • Clean up the mold and dry the surfaces before painting. Paint applied over moldy surfaces is likely to peel.  If you are unsure about how to clean an item, or if the item is expensive or of sentimental value, you may wish to consult a specialist. Specialists in furniture repair and restoration, painting and art restoration and conservation, carpet and rug cleaning, water damage, and fire or water restoration are commonly listed in phone books. Be sure to ask for and check references. Look for specialists who are affiliated with professional organizations.
What to Wear When Cleaning Moldy Areas:  
  • Avoid breathing in mold or mold spores.  In order to limit your exposure to airborne mold, you may want to wear an N-95 respirator, available at many hardware stores and from  companies that advertise on the Internet. (They cost about $12 to $25.)  Some N-95 respirators resemble a paper dust mask with a nozzle on the front, and others are made primarily of plastic or rubber and have removable cartridges that trap and prevent most of the mold spores from entering.  In order to be effective, the respirator or mask must fit properly, so carefully follow the instructions supplied with the respirator. Please note that the Occupational Safety and Health Administration (OSHA) requires that respirators fit properly (via fit testing) when used in an occupational setting.
  • Wear gloves. Long gloves that extend to the middle of the forearm are recommended.  When working with water and a mild detergent, ordinary household rubber gloves may be used.  If you are using a disinfectant, a biocide such as chlorine bleach, or a strong cleaning solution, you should select gloves made from natural rubber, neoprene, nitrile, polyurethane or PVC.  Avoid touching mold or moldy items with your bare hands.
  • Wear goggles. Goggles that do not have ventilation holes are recommended. Avoid getting mold or mold spores in your eyes.
How do I know when the remediation or cleanup is finished?

You must have completely fixed the water or moisture problem before the cleanup or remediation can be considered finished, based on the following guidelines:

  • You should have completed the mold removal.  Visible mold and moldy odors should not be present.  Please note that mold may cause staining and cosmetic damage.
  • You should have revisited the site(s) shortly after cleanup, and it should show no signs of water damage or mold growth.
  • People should have been able to occupy or re-occupy the area without health complaints or physical symptoms.
  • Ultimately, this is a judgment call; there is no easy answer. If you have concerns or questions, be sure to ask your InterNACHI inspector during your next scheduled inspection.


Moisture and Mold Prevention and Control Tips
  • Moisture control is the key to mold control, so when water leaks or spills occur indoors, ACT QUICKLY.  If wet or damp materials or areas are dried within 24 to 48 hours after a leak or spill happens, in most cases, mold will not grow.
  • Clean and repair roof gutters regularly.
  • Make sure the ground slopes away from the building’s foundation so that water does not enter or collect around the foundation.
  • Keep air-conditioning drip pans clean and the drain lines unobstructed and flowing properly.
  • Keep indoor humidity low.  If possible, keep indoor humidity below 60% relative humidity (ideally, between 30% to 50%).  Relative humidity can be measured with a moisture or humidity meter, which is a small, inexpensive instrument (from $10 to $50) that is available at many hardware stores.
  • If you see condensation or moisture collecting on windows, walls or pipes, ACT QUICKLY to dry the wet surface and reduce the moisture/water source.  Condensation can be a sign of high humidity.

Actions that will help to reduce humidity:

  • Vent appliances that produce moisture, such as clothes dryers, stoves, and kerosene heaters, to the outdoors, where possible.  (Combustion appliances, such as stoves and kerosene heaters, produce water vapor and will increase the humidity unless vented to the outside.)
  • Use air conditioners and/or de-humidifiers when needed.
  • Run the bathroom fan or open the window when showering.  Use exhaust fans or open windows whenever cooking, running the dishwasher or dishwashing, etc.

Actions that will help prevent condensation:

  • Reduce the humidity (see above).
  • Increase ventilation and air movement by opening doors and/or windows, when practical.  Use fans as needed.
  • Cover cold surfaces, such as cold water pipes, with insulation.
  • Increase air temperature.

Testing or Sampling for Mold

Is sampling for mold needed?  In most cases, if visible mold growth is present, sampling is unnecessary.  Since no EPA or other federal limits have been set for mold or mold spores, sampling cannot be used to check a building’s compliance with federal mold standards.  Surface sampling may be useful to determine if an area has been adequately cleaned or remediated.  Sampling for mold should be conducted by professionals who have specific experience in designing  mold sampling protocols, sampling methods, and interpreting results.  Sample analysis should follow analytical methods recommended by the American Industrial Hygiene Association (AIHA), the American Conference of Governmental Industrial Hygienists (ACGIH), or other professional organizations.
Suspicion of Hidden Mold
You may suspect hidden mold if a building smells moldy but you cannot see the source, or if you know there has been water damage and residents are reporting health problems. Mold may be hidden in places such as the backside of dry wall, wallpaper or paneling, the top-side of ceiling tiles, or the underside of carpets and pads, etc. Other possible locations of hidden mold include areas inside walls around pipes (with leaking or condensing pipes), the surface of walls behind furniture (where condensation forms), inside ductwork, and in roof materials above ceiling tiles (due to roof leaks or insufficient insulation).
 
Investigating Hidden Mold Problems
Investigating hidden mold problems may be difficult and will require caution when the investigation involves disturbing potential sites of mold growth. For example, removal of wallpaper can lead to a massive release of spores if there is mold growing on the underside of the paper. If you believe that you may have a hidden mold problem, consider hiring an experienced professional.
 
Cleanup and Biocides
Biocides are substances that can destroy living organisms. The use of a chemical or biocide that kills organisms such as mold (chlorine bleach, for example) is not recommended as a routine practice during mold cleanup. There may be instances, however, when professional judgment may indicate its use (for example, when immune-compromised individuals are present). In most cases, it is not possible or desirable to sterilize an area; a background level of mold spores will remain, and these spores will not grow if the moisture problem has been resolved. If you choose to use disinfectants or biocides, always ventilate the area and exhaust the air to the outdoors. Never mix chlorine bleach with other cleaning solutions or detergents that contain ammonia because toxic fumes could be produced.   
Please note: Dead mold may still cause allergic reactions in some people, so it is not enough to simply kill the mold; it must also be removed.
Ten Things You Should Know About Mold
 
 1.  Potential health effects and symptoms associated with mold exposure include allergic reactions, asthma, and other respiratory complaints.
 2.  There is no practical way to eliminate all mold and mold spores in the indoor environment; the way to control indoor mold growth is to control moisture.
 3.  If mold is a problem in your home, you must clean up the mold and eliminate sources of moisture.
 4.  Fix the source of the water problem or leak to prevent mold growth.
 5.  Reduce indoor humidity (to 30% to 60%) to decrease mold growth by:

a. venting bathrooms, dryers, and other moisture-generating sources to the outside;
b. using air conditioners and de-humidifiers;
c. increasing ventilation; and
d. using exhaust fans whenever cooking, dishwashing, and cleaning.
 6.  Clean and dry any damp or wet building materials and furnishings within 24 to 48 hours to prevent mold growth.
 7.  Clean mold off hard surfaces with water and detergent, and dry completely. Absorbent materials that are moldy (such as carpeting and ceiling tiles) may need to be replaced.
 8.  Prevent condensation.  Reduce the potential for condensation on cold surfaces (i.e., windows, piping, exterior walls, roof and floors) by adding insulation.
 9.  In areas where there is a perpetual moisture problem, do not install carpeting.
10.  Molds can be found almost anywhere; they can grow on virtually any substance, provided moisture is present. There are molds that can grow on wood, paper, carpet, and foods.

Moisture Intrusion

Moisture Intrusion

by Nick Gromicko, CMI® and Kenton Shepard

Moisture intrusion can be the cause of building defects, as well as health ailments for the building’s occupants. Inspectors should have at least a basic understanding of how moisture may enter a building, and where problem areas commonly occur.
Some common moisture-related problems include:
  • structural wood decay;
  • high indoor humidity and resulting condensation;
  • expansive soil, which may crack the foundation through changes in volume, or softened soil, which may lose its ability to support an overlying structure;
  • undermined foundations;
  • metal corrosion;
  • ice dams; and
  • mold growth.  Mold can only grow in the presence of high levels of moisture. People who suffer from the following conditions can be seriously (even fatally) harmed if exposed to elevated levels of airborne mold spores:
    • asthma;
    • allergies;
    • lung disease; and/or
    • compromised immune systems.

Note:  People who do not suffer from these ailments may still be harmed by elevated levels of airborne mold spores.

How does moisture get into the house?

Moisture or water vapor moves into a house in the following ways:

  • air infiltration. Air movement accounts for more than 98% of all water vapor movement in building cavities. Air naturally moves from high-pressure areas to lower ones by the easiest path possible, such as a hole or crack in the building envelope. Moisture transfer by air currents is very fast (in the range of several hundred cubic feet of air per minute). Replacement air will infiltrate through the building envelope unless unintended air paths are carefully and permanently sealed;
  • by diffusion through building material. Most building materials slow moisture diffusion, to a large degree, although they never stop it completely;
  • leaks from roof;
  • plumbing leaks;
  • flooding, which can be caused by seepage from runoff or rising groundwater; it may be seasonal or catastrophic; and
  • human activities, including bathing, cooking, dishwashing and washing clothes. Indoor plants, too, may be a significant source of high levels of humidity.
Climate Zones
In the northern U.S., moisture vapor problems are driven primarily by high indoor relative humidity levels, combined with low outdoor temperatures during the winter. In the southern U.S. (especially the southeast), the problem is largely driven by high outdoor humidity and low indoor temperatures during summer months. Mixed climates are exposed to both conditions and can experience both types of problems. Humid climates, in general, will be more of a problem than dry climates. Wind-driven rain is the main cause of leaks through the building envelope.

Inspectors can check for moisture intrusion in the following areas:

Roofs 

A roof leak may lead to the growth of visible mold colonies in the attic that can grow unnoticed. Roof penetrations increase the likelihood of water leaks due to failed gaskets, sealants and flashing. The number of roof penetrations may be reduced by a variety of technologies and strategies, including:


  • consolidation of vent stacks below the roof;
  • exhaust fan caps routed through walls instead of the roof;
  • high-efficiency combustion appliances, which can be sidewall-vented;
  • electrically powered HVAC equipment and hot water heaters that do not require flue; and
  • adequate flashing. Oftentimes, inspectors discover missing, incorrectly installed or corroded flashing pipes.

Plumbing

  • Distribution pipes and plumbing fixtures can be the source of large amounts of moisture intrusion. If the wall is moist and/or discolored, then moisture damage is already in progress. Most plumbing is hidden in the walls, so serious problems can begin unnoticed.
  • One of the most important means of moisture management in the bathroom is the exhaust fan. A non-functioning exhaust fan overloads the bathroom with damp air. If the exhaust fan doesn’t turn on automatically when the bathroom is in use, consider recommending switching the wiring or switch. The lack of an exhaust fan should be called out in the inspection report. The fan should vent into the exterior, not into the attic.
  • The bathroom sink, in particular, is a common source of moisture intrusion and damage. Although overflow drains can prevent the spillage of water onto the floor, they can become corroded and allow water to enter the cabinet.
  • Use a moisture meter to check for elevated moisture levels in the sub-floor around the toilet and tub.
  • Bathroom windows need to perform properly in a wide range of humidity and temperature conditions. Check to see if there are any obvious breaks in the weatherstripping and seals. Are there are stains or flaking on the painted surfaces?
  • Check showers and bathtubs. Is the caulking is cracked, stiff or loose in spots? Are there cracked tiles or missing grout that may channel water to vulnerable areas? If some water remains in the bathtub after draining, it may be a warning sign of possible structural weakening and settlement in the floor beneath the tub.

Utility Room

  • The water heater tank should be clean and rust-free.
  • The area around the water softener tank should be clean and dry.
  • Check that all through-the-wall penetrations for fuel lines, ducts, and electrical systems of heating system are well-sealed. All ducts should be clean and dust-free. Inspect the air supply registers in the house for dust accumulation.
  • Filters, supply lines, exterior wall penetrations, vents, ductwork and drainage of the cooling system must all be in good working order to avoid moisture problems.

Attic

  • Look for stains or discolorations at all roof penetrations. Chimneys, plumbing vents and skylight wells are common places where moisture may pass through the roof. Any such locations must be inspected for wetness, a musty smell and/or visible signs of mold.
  • Are there areas of the insulation that appear unusually thin?
  • Rust or corrosion around recessed lights are signs of a potential electrical hazard.

Foundations

Model building codes typically require damp-proofing of foundation walls. The damp-proofing shall be applied from the top of the footing to the finished grade. Parging of foundation walls should be damp-proofed in one of the following ways:
  • bituminous coating;
  • 3 pounds per square yard of acrylic modified cement;
  • 1/8-inch coat of surface-bonding cement; or
  • any material permitted for water-proofing.
In summary, moisture can enter a building in a number of different ways. High levels of moisture can cause building defects and health ailments.

Changing the HVAC filter

Homeowner Maintenance: Changing the HVAC Filter

by Nick Gromicko, CMI® and Kate Tarasenko
Part of responsible homeownership includes, of course, regular home maintenance.  And there are some tasks that, if deferred, can lead to a home system that’s inefficient and overworked, which can result in problems and expenses.  One such task is changing the filter of the home’s HVAC system.  It’s simple and inexpensive, and taking care of it at least every three months can meAs InterNACHI member-inspector Ron Perkerewicz no doubt explained to his client, the furnace filter will work much better if it's removed from its packaging first.an the difference between optimum comfort and avoidable repairs.
What Can Go Wrong

Most homes have some sort of furnace or heat pump, and many of those homes (especially newer ones) have combined heating, ventilation and air-conditioning or HVAC systems.  Each type uses some type of air filter or screen to prevent larger airborne particles (up to 40 microns) from entering the system and clogging sensitive machinery.  A system that has a dirty filter can suffer from pressure drop, which can lead to reduced air flow, or “blow-out,” resulting in no air infiltration at all.  Any of these conditions can cause the system to work harder to keep the home warm or cool (depending on the season and the setting).  And any mechanical component that has to work harder to run efficiently puts undue stress on the whole system, which can lead to premature failure, resulting in repair or replacement.

Also, a dirty filter that’s exposed to condensation can become damp, which can lead to mold growth that can be spread throughout the home by the HVAC system.  This can lead to serious health consequences, not to mention a compromised unit that will likely require servicing and may require replacement, depending on the severity of the moisture problem.

Types of Filters

Most HVAC and furnace filters are disposable, made of biodegradable paper or similar media, and shaped in cells, screens or fins designed to trap as much airborne debris as possible.  Filters can typically be purchased in economical multi-packs, and there are many types that will fit different models of furnace/HVAC units.  It’s important to use the appropriate filter for your unit; using the wrong filter that doesn’t fit the unit properly can create the same types of problems as having a dirty filter.  Your HVAC installer can show you where the filter goes and how to remove the old one and install a new one.  Your unit may also have an affixed label with directions for easy filter replacement.

How Often?

Your HVAC or furnace technician should service your unit once a year.  Because a furnace/HVAC unit contains moving parts, it’s important that belts are not cracked and dry, ventilation ductwork is not gapped, cracked or rusted, and components, such as coils and fans, are clog-free and adequately lubricated for unimpeded operation.  This sort of evaluation is best left to the professional, unless the homeowner has had the appropriate training.

The filter of the unit, especially if it’s an HVAC unit that will tend to get nearly year-round use, should be changed by the homeowner at least every three months, but possibly more often.

Check your filter’s condition and change it once a month if:

  • You run your unit six months a year to year-round.
  • You have pets.  Pet dander can become airborne and circulate through the home’s ventilation system just as typical household dust does.
  • You have a large family.  More activity means more household dust, dirt and debris.
  • You smoke indoors.
  • You or someone in your household suffers from allergies or a respiratory condition.
  • You live in a particularly windy area or experience high winds for extended periods, especially if there are no nearby shrubs or trees to provide a natural windbreak.
  • You live in an area prone to or having recently experienced any wildfires.  Airborne ash outdoors will eventually find its way indoors.
  • You have a fireplace that you occasionally use.
  • You live on a working farm or ranch.  Dust and dirt that gets kicked up by outdoor work activity and/or large animals can be pulled into the home’s ventilation system, especially through open windows.
  • You have a large garden.  Depending on its size and how often you work it, tilling soil, planting, pulling weeds, using herbicides and pesticides, and even watering mean that dirt, chemicals and condensation can be pulled into your home’s ventilation system.
  • There is construction taking place around or near the home.  You may be installing a new roof or a pool, or perhaps a neighbor is building a home or addition.  Even if the activity is only temporary, dust and debris from worksites adjacent to or near the home can be sucked into the home’s ventilation system, and this increased activity can tax your HVAC system.

Change the filter immediately if:

  • The filter is damaged.  Whether it happened inside the packaging or while being installed, a damaged filter that has bent fins, collapsed cells or holes will not work as well as an undamaged filter, especially if it allows system air to bypass the filter at any point.
  • The filter is damp.  A filter affected by moisture intrusion, system condensation, or even high indoor humidity can quickly become moldy and spread airborne mold spores throughout the home via the ventilation system.
  • There is evidence of microbial growth or mold on the filter.  Mold spores already infiltrating the home via the HVAC system are not only bad for the unit itself, but they can pose a health hazard for the family, ranging from an irritated respiratory system to a serious allergic reaction.  The musty smell produced by a moldy HVAC filter is also unpleasant and may take a while to completely eradicate from inside the home.  If you discover that you have moldy air filter, it’s important to have the cause investigated further.  An InterNACHI inspector or HVAC technician can help determine the problem so that it doesn’t recur.

Tips on Changing the Filter

  • Turn off the unit before replacing the filter.
  • Use the right filter for your unit and make sure it’s not damaged out of the package.
  • Follow the directions for your unit to make sure you’re installing the filter properly.  For example, many filters use different colors for the front and back (or upstream and downstream flow) so that they’re not installed backwards.
  • Make sure there aren’t any gaps around the filter frame.  If this is the case, you may have the wrong size filter, or the filter itself may be defective or damaged.
  • Use a rag to clean up any residual dust before and after you replace the filter.
  • Securely replace any levers, gaskets and/or seals.
  • Turn the unit on and observe it while it’s operating to make sure the filter stays in place.
  • Note the date of filter replacement in a convenient location for the next time you inspect it.  A filter that becomes dirty enough to change within a short period of time may indicate a problem with the unit or ventilation system, so monitoring how often the filter requires changing is important information for your technician to have.

Call a technician for servicing if:

  • Your unit fails to turn back on.
  • The fan is slow or makes excessive noise, or the fins are bent.
  • The coils are excessively dusty or clogged.
  • You notice moisture intrusion from an unknown source anywhere in the system.
Homeowners who take care of the easy task of changing their HVAC filter can help prevent system downtime and avoidable expenses, as well as keep their families living and breathing comfortably.  Your InterNACHI inspector can provide more useful tips and reminders during your annual home maintenance inspection.

Ground-Fault Circuit Interrupters (GFCIs)

Ground-Fault Circuit Interrupters (GFCIs)

by Nick Gromicko, CMI® and Ethan Ward

What is a GFCI?

A ground-fault circuit interrupter, or GFCI, is a device used in electrical wiring to disconnect a circuit when unbalanced current is detected between an energized conductor and a neutral return conductor.  Such an imbalance is sometimes caused by current “leaking” through a person who is simultaneously in contact with a ground and an energized part of the circuit, which could result in lethal shock.  GFCIs are designed to provide protection in such a situation, unlike standard circuit breakers, which guard against overloads, short circuits and ground faults.
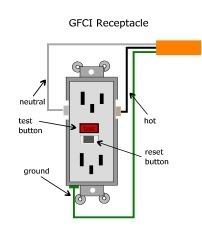
It is estimated that about 300 deaths by electrocution occur every year, so the use of GFCIs has been adopted in new construction, and recommended as an upgrade in older construction, in order to mitigate the possibility of injury or fatality from electric shock.

History

The first high-sensitivity system for detecting current leaking to ground was developed by Henri Rubin in 1955 for use in South African mines.  This cold-cathode system had a tripping sensitivity of 250 mA (milliamperes), and was soon followed by an upgraded design that allowed for adjustable trip-sensitivity from 12.5 to 17.5 mA.  The extremely rapid tripping after earth leakage-detection caused the circuit to de-energize before electric shock could drive a person’s heart into ventricular fibrillation, which is usually the specific cause of death attributed to electric shock.

Charles Dalziel first developed a transistorized version of the ground-fault circuit interrupter in 1961.  Through the 1970s, most GFCIs were of the circuit-breaker type.  This version of the GFCI was prone to frequent false trips due to poor alternating-current characteristics of 120-volt insulations.  Especially in circuits with long cable runs, current leaking along the conductors’ insulation could be high enough that breakers tended to trip at the slightest imbalance.
Since the early 1980s, ground-fault circuit interrupters have been built into outlet receptacles, and advances in design in both receptacle and breaker types have improved reliability while reducing instances of “false trips,” known as nuisance-tripping.

NEC Requirements for GFCIs

The National Electrical Code (NEC) has included recommendations and requirements for GFCIs in some form since 1968, when it first allowed for GFCIs as a method of protection for underwater swimming pool lights.  Throughout the 1970s, GFCI installation requirements were gradually added for 120-volt receptacles in areas prone to possible water contact, including bathrooms, garages, and any receptacles located outdoors.

The 1980s saw additional requirements implemented.  During this period, kitchens and basements were added as areas that were required to have GFCIs, as well as boat houses, commercial garages, and indoor pools and spas.  New requirements during the ’90s included crawlspaces, wet bars and rooftops.  Elevator machine rooms, car tops and pits were also included at this time.  In 1996, GFCIs were mandated for all temporary wiring for construction, remodeling, maintenance, repair, demolition and similar activities and, in 1999, the NEC extended GFCI requirements to carnivals, circuses and fairs.

The 2008 NEC contains additional updates relevant to GFCI use, as well as some exceptions for certain areas.  The 2008 language is presented here for reference.

2008 NEC on GFCIs

100.1 Definition

100.1  Definitions. Ground-Fault Circuit Interrupter. A device intended for the protection of personnel that functions to de-energize a circuit or portion thereof within an established period of time when a current to ground exceeds the values established for a Class A device.

FPN: Class A ground-fault circuit interrupters trip when the current to ground has a value in the range of 4 mA to 6 mA.  For further information, see UL 943, standard for Ground-Fault Circuit Interrupters.

210.8(A)&(B)  Protection for Personnel

210.8 Ground-Fault Circuit Interrupter Protection for Personnel.

(A)  Dwelling Units. All 125-volt, single-phase, 15- and 20-ampere receptacles installed in the locations specified in (1) through (8) shall have ground-fault circuit-interrupter protection for personnel.

(1)   bathrooms;

(2)   garages, and also accessory buildings that have a floor located at or below grade level not intended as habitable rooms and limited to storage areas, work areas, and areas of similar use;

Exception No. 1: Receptacles not readily accessible.

Exception No. 2: A single receptacle or a duplex receptacle for two appliances that, in normal use, is not easily moved from one place to another and that is cord-and-plug connected in accordance with 400.7(A)(6), (A)(7), or (A)(8).

Receptacles installed under the exceptions to 210.8(A)(2) shall not be considered as meeting the requirements of 210.52(G)

(3)   outdoors;

Exception: Receptacles that are not readily accessible and are supplied by a dedicated branch circuit for electric snow melting or deicing equipment shall be permitted to be installed in accordance with the applicable provisions of Article 426.

(4)   crawlspaces at or below grade level.

Exception No. 1: Receptacles that are not readily accessible.

Exception No. 2:  A single receptacle or a duplex receptacle for two appliances that, in normal use, is not easily moved from one place to another and that is cord-and-plug connected in accordance with 400.7(A)(6), (A)(7), or (A)(8).

Exception No. 3: A receptacle supplying only a permanently installed fire alarm or burglar alarm system shall not be required to have ground-fault circuit interrupter protection.

Receptacles installed under the exceptions to 210.8(A)(2) shall not be considered as meeting the requirements of 210.52(G)

(6)   kitchens, where the receptacles are installed to serve the countertop surfaces;

(7)   wet bar sinks, where the receptacles are installed to serve the countertop surfaces and are located within 6 feet (1.8 m) of the outside edge of the wet bar sink;

(8)   boathouses;

(B) Other Than Dwelling Units. All 125-volt, single-phase, 15- and 20-ampere receptacles Installed in the locations specified in (1), (2), and (3) shall have ground-fault circuit interrupter protection for personnel:

(1)   bathrooms;

(2)   rooftops;

Exception: Receptacles that are not readily accessible and are supplied by a dedicated branch circuit for electric snow-melting or de-icing equipment shall be permitted to be installed in accordance with the applicable provisions of Article 426.

(3)   kitchens.

Testing Receptacle-Type GFCIs

Receptacle-type GFCIs are currently designed to allow for safe and easy testing that can be performed without any professional or technical knowledge of electricity.  GFCIs should be tested right after installation to make sure they are working properly and protecting the circuit.  They should also be tested once a month to make sure they are working properly and are providing protection from fatal shock.
To test the receptacle GFCI, first plug a nightlight or lamp into the outlet. The light should be on.  Then press the “TEST” button on the GFCI. The “RESET” button should pop out, and the light should turn off.
If the “RESET” button pops out but the light does not turn off, the GFCI has been improperly wired. Contact an electrician to correct the wiring errors.

If the “RESET” button does not pop out, the GFCI is defective and should be replaced.

If the GFCI is functioning properly and the lamp turns off, press the “RESET” button to restore power to the outlet.

Geothermal Heating and Cooling Systems

Geothermal Heating and Cooling Systems

by Nick Gromicko, CMI® and Kenton Shepard

Geothermal systems are home heating and cooling systems that gather heat from the earth. Geothermal heat pumps (GHPs) use the relatively constant temperature of sub-surface soil as the exchange medium.Geothermal closed loop horizontal configuration

Geographical Distribution
  • As of 2004, five countries — El Salvador, Kenya, the Philippines, Iceland and Costa Rica — generate more than 15% of their electricity from geothermal sources. In Iceland, geothermal energy is so cheap that some sections of pavement are heated.
  • In the United States, roughly 50,000 geothermal heat pumps are installed every year. The U.S. leads the world in geothermal exploitation.
  • The combined production of geothermal energy for all uses places third among renewable energy sources, following hydroelectricity and biomass, and ahead of solar and wind.
Where does geothermal energy come from?
Beneath the Earth’s crust, there is a layer of hot, molten rock called magma. Heat is continually produced there, mostly from the decay of naturally radioactive materials, such as uranium and potassium. The amount of heat within the first 33,000 feet (or 10,000 meters) of the Earth’s surface contains 50,000 times more energy than all the oil and natural gas resources in the world combined.

Benefits of Geothermal Energy:

  • energy efficiency. GHPs require 25% to 50% less electricity than conventional heating and cooling systems. According to the EPA, geothermal heat pumps can reduce energy consumption — and corresponding emissions — up to 44%, compared to air-source heat pumps, and up to 72%, compared to electric resistance heating with standard air-conditioning equipment.Geothermal closed loop vertical configuration
  • design flexibility. Geothermal heat pump systems can be installed in both new and retrofit construction. Equipment rooms can be scaled down in size because the hardware requires less space than is needed by conventional HVAC systems. GHP systems also provide excellent “zone” space conditioning, which allows different parts of a home to be heated or cooled to different temperatures.
  • durability. Since GHP systems have relatively few moving parts and the parts are sheltered inside a building, the systems are durable and reliable. The underground piping often carries warranties of 25 to 50 years, and the heat pumps can last more than 20 years. The components are easily accessible, which helps ensure that the required maintenance is performed on a timely basis.
  • noise reduction. As they have no outside condensing units (such as those in air conditioners), there’s no noise outside the home. Geothermal heat pumps are so quiet inside of a house that users may not be aware they are operating.

How do geothermal systems work?
A geothermal heat pump, unlike a furnace, does not create heat by burning fuel. Instead, it collects the earth’s natural heat through a series of pipes, called a loop, installed below the frost line. At that depth, which varies by climate zone, the soil remains at a relatively constant temperature throughout the year. Fluid circulates through the loop and carries heat to the house. There, an electrically driven compressor and a heat exchanger concentrate the heat and release it inside the home at a higher temperature, where ductwork distributes the heat to different rooms. In summer, the underground loop draws excess heat from the house and allows it to be absorbed into the earth. The system cools the home in the same way that a refrigerator keeps food cool — by drawing heat from the interior, rather than by forcing in cold air.Geothermal closed loop pond/lake configuration

Types of Systems
According to InterNACHI, there are four basic types of geothermal systems. Selection of the most appropriate system depends on the climate, soil conditions, available land, and local installation costs at the site. All of these systems can be used for residential and commercial building applications. They include:

  • horizontal:  This type of installation is generally the most cost-effective for residential installations, particularly for new construction where sufficient land is available. The most common layouts use either two pipes (one buried at 6 feet, and the other at 4 feet), or two pipes placed side-by-side buried 5 feet in the ground in a 2-foot wide trench.
  • vertical:  Large commercial buildings and schools often use vertical systems because the land area required for horizontal loops is prohibitive. Vertical loops are also used where the soil is too shallow for trenching, and they minimize the disturbance to existing landscaping. For a vertical system, holes (approximately 4 inches in diameter) are drilled about 20 feet apart and 100 to 400 feet deep. Two pipes are inserted into these holes and connected at the bottom to form a loop. The vertical loops are connected to the heat pump in the building.
  • pond/lake:  A supply-line pipe is run underground from the building to a body of water and coiled into circles at least 8 feet under the surface. In order for the body of water to be adequate, it must meet minimum volume, depth and quality criteria.
  • open-loop system:  This type of system uses well or surface water as the heat exchange fluid that circulates directly through the GHP system. Once it has circulated through the system, the water returns to the ground through the well, a recharge well, or surface discharge. Geothermal open loop well configuration This option is practical only where there is an adequate supply of relatively clean water, which must comply with local codes and regulations regarding groundwater discharge.

Cost
A geothermal system usually costs about $2,500 per ton of capacity. A typical home uses a 3-ton unit costing roughly $7,500. That initial cost is nearly twice the price of a regular heat pump system that includes air conditioning. The cost of drilling, however, can be considerable; drilling can cost in excess of $30,000, depending on the terrain and other local factors. Systems that require drilling vertically deep into the ground will cost much more than systems where the loops are in a horizontal fashion and closer to the surface. Despite these initial costs, a geothermal system saves enough on utility bills that the investment is often recouped in five to ten years.

In summary, geothermal systems heat and cool homes using sub-surface soil as an exchange medium. Geothermal systems are more expensive to install than conventional furnaces, but their operating costs are significantly lower.

Electrical Safety

Electrical Safety

Electricity is an essential part of our lives. However, it has the potential to cause great harm. Electrical systems will function almost indefinitely, if properly installed and not overloaded or physically abused. Electrical fires in our homes claim the lives of 485 Americans each year and injure 2,305 more. Some of these fires are caused by electrical system failures and appliance defects, but many more are caused by the misuse and poor maintenance of electrical appliances, incorrectly installed wiring, and overloaded circuits and extension cords.
Some safety tips to remember:
  • Never use anything but the proper fuse to protect a circuit. 
  • Find and correct overloaded circuits.
  • Never place extension cords under rugs.
  • Outlets near water should be GFCI-type outlets.
  • Don’t allow trees near power lines to be climbed.
  • Keep ladders, kites, equipment and anything else away from overhead power lines.
Electrical Panels
Electricity enters the home through a control panel and a main switch where one can shut off all the power in an emergency. These panels are usually located in the basement. Control panels use either fuses or circuit breakers. Install the correct fuses for the panel. Never use a higher-numbered fuse or a metallic item, such as a penny. If fuses are used and there is a stoppage in power, look for the broken metal strip in the top of a blown fuse. Replace the fuse with a new one marked with the correct amperage. Reset circuit breakers from “off” to “on.” Be sure to investigate why the fuse or circuit blew. Possible causes include frayed wires, overloaded outlets, or defective appliances. Never overload a circuit with high-wattage appliances. Check the wattage on appliance labels. If there is frayed insulation or a broken wire, a dangerous short circuit may result and cause a fire. If power stoppages continue or if a frayed or broken wire is found, contact an electrician.

Outlets and Extension Cords
Make sure all electrical receptacles or outlets are three-hole, grounded outlets. If there is water in the area, there should be a GFCI or ground-fault circuit interrupter outlet. All outdoor outlets should be GFCIs. There should be ample electrical capacity to run equipment without tripping circuit breakers or blowing fuses. Minimize extension cord use. Never place them under rugs. Use extension cords sparingly and check them periodically. Use the proper electrical cord for the job, and put safety plugs in unused outlets.

Electrical Appliances

Appliances need to be treated with respect and care. They need room to breathe. Avoid enclosing them in a cabinet without proper openings, and do not store papers around them. Level appliances so they do not tip. Washers and dryers should be checked often. Their movement can put undue stress on electrical connections. If any appliance or device gives off a tingling shock, turn it off, unplug it, and have a qualified person correct the problem. Shocks can be fatal. Never insert metal objects into appliances without unplugging them. Check appliances periodically to spot worn or cracked insulation, loose terminals, corroded wires, defective parts and any other components that might not work correctly. Replace these appliances or have them repaired by a person qualified to do so.
Electrical Heating Equipment
Portable electrical heating equipment may be used in the home as a supplement to the home heating system. Caution must be taken when using these heating supplements. Keep them away from combustibles, and make sure they cannot be tipped over. Keep electrical heating equipment in good working condition. Do not use them in bathrooms because of the risk of contact with water and electrocution. Many people use electric blankets in their homes. They will work well if they are kept in good condition. Look for cracks and breaks in the wiring, plugs and connectors. Look for charred spots on both sides. Many things can cause electric blankets to overheat. They include other bedding placed on top of them, pets sleeping on top of them, and putting things on top of the blanket when it is in use. Folding the blankets can also bend the coils and cause overheating.
 
Children
Electricity is important to the workings of the home, but can be dangerous, especially to children. Electrical safety needs to be taught to children early on. Safety plugs should be inserted in unused outlets when toddlers are in the home. Make sure all outlets in the home have face plates. Teach children not to put things into electrical outlets and not to chew on electrical cords. Keep electrical wiring boxes locked. Do not allow children to come in contact with power lines outside. Never allow them to climb trees near power lines, utility poles or high tension towers.
 
Electricity and Water
A body can act like a lightning rod and carry the current to the ground. People are good conductors of electricity, particularly when standing in water or on a damp floor. Never use any electrical appliance in the tub or shower. Never touch an electric cord or appliance with wet hands. Do not use electrical appliances in damp areas or while standing on damp floors. In areas where water is present, use outlets with GFCIs. Shocks can be fatal.
Animal Hazards
Mice and other rodents can chew on electrical wires and damage them. If rodents are suspected or known to be in the home, be aware of the damage they may cause, and take measures to get rid of them.
Outside Hazards
There are several electrical hazards outside the home. Be aware of overhead and underground power lines. People have been electrocuted when an object they are moving has come in contact with the overhead power lines. Keep ladders, antennae, kites and poles away from power lines leading to the house and other buildings. Do not plant trees, shrubs or bushes under power lines or near underground power lines. Never build a swimming pool or other structure under the power line leading to your house. Before digging, learn the location of underground power lines.
Do not climb power poles or transmission towers. Never let anyone shoot or throw stones at insulators. If you have an animal trapped in a tree or on the roof near electric lines, phone your utility company. Do not take a chance of electrocuting yourself. Be aware of weather conditions when installing and working with electrical appliances. Never use electrical power tools or appliances with rain overhead or water underfoot. Use only outdoor lights, fixtures and extension cords. Plug into outlets with a GFCI. Downed power lines are extremely dangerous. If you see a downed power line, call the electric company, and warn others to stay away. If a power line hits your car while you are in it, stay inside unless the car catches fire. If the car catches fire, jump clear without touching metal and the ground at the same time.
MORE SAFETY PRECAUTIONS :
  • Routinely check your electrical appliances and wiring.
  • Hire an InterNACHI inspector. InterNACHI inspectors must pass rigorous safety training and are knowledgeable in the ways to reduce the likelihood of electrocution.
  • Frayed wires can cause fires. Replace all worn, old and damaged appliance cords immediately.
  • Use electrical extension cords wisely and don’t overload them.
  • Keep electrical appliances away from wet floors and counters; pay special care to electrical appliances in the bathroom and kitchen.
  • Don’t allow children to play with or around electrical appliances, such as space heaters, irons and hair dryers.
  • Keep clothes, curtains and other potentially combustible items at least 3 feet from all heaters.
  • If an appliance has a three-prong plug, use it only in a three-slot outlet. Never force it to fit into a two-slot outlet or extension cord.
  • Never overload extension cords or wall sockets. Immediately shut off, then professionally replace, light switches that are hot to the touch, as well as lights that flicker. Use safety closures to childproof electrical outlets.
  • Check your electrical tools regularly for signs of wear. If the cords are frayed or cracked, replace them. Replace any tool if it causes even small electrical shocks, overheats, shorts out or gives off smoke or sparks.
In summary, household electrocution can be prevented by following the tips offered in this guide and by hiring an InterNACHI inspector.

Radon

Radon


Checklist for Inspecting Radon Mitigation Systems in Residential Homes

https://www.nachi.org/comsop.htm#19 

Home Buyer’s and Seller’s Guide to Radon 

The EPA recommends:

  • If you are buying a home or selling your home, have it tested for radon.
  • For a new home, ask if radon-resistant construction features were used and if the home has been tested.
  • Fix the home if the radon level is 4 picoCuries per liter (pCi/L) or higher.
  • Radon levels less than 4 pCi/L still pose a risk, and in many cases, may be reduced.
  • Take steps to prevent device interference when conducting a radon test.

The EPA estimates that radon causes thousands of cancer deaths in the U.S. each year.

 * Radon is estimated to cause about 21,000 lung cancer deaths per year.

The numbers of deaths from other causes are taken from the Centers for Disease Control and Prevention’s 1999-2001 National Center for Injury Prevention and Control Report and 2002 National Safety Council Reports.

Radon is a cancer-causing, radioactive gas.

You cannot see, smell or taste radon. But it still may be a problem in your home.  When you breathe air containing radon, you increase your risk of getting lung cancer.  In fact, the Surgeon General of the United States has warned that radon is the second leading cause of lung cancer in the United States today.  If you smoke and your home has high radon levels, your risk of lung cancer is especially high.

You should test for radon.

Testing is the only way to find out your home’s radon levels. The EPA and the Surgeon General recommend testing all homes below the third floor for radon.

You can fix a radon problem.

If you find that you have high radon levels, there are ways to fix a radon problem. Even very high levels can be reduced to acceptable levels.

If You Are Selling a Home…

The EPA recommends that you test your home before putting it on the market and, if necessary, lower your radon levels. Save the test results and all information you have about steps that were taken to fix any problems. This could be a positive selling point.

If You Are Buying a Home…

The EPA recommends that you know what the indoor radon level is in any home you are considering buying.  Ask the seller for their radon test results.  If the home has a radon-reduction system, ask the seller for information they have about the system.

If the home has not yet been tested, you should have the house tested.

If you are having a new home built, there are features that can be incorporated into your home during construction to reduce radon levels.

These radon testing guidelines have been developed specifically to deal with the time-sensitive nature of home purchases and sales, and the potential for radon device interference.  These guidelines are slightly different from the guidelines in other EPA publications which provide radon testing and reduction information for non-real estate situations.

This guide recommends three short-term testing options for real estate transactions.  The EPA also recommends testing a home in the lowest level which is currently suitable for occupancy, since a buyer may choose to live in a lower area of the home than that used by the seller.

1. Why do you need to test for radon?

a. Radon has been found in homes all over the U.S.

Radon is a radioactive gas that has been found in homes all over the United States. It comes from the natural breakdown of uranium in soil, rock and water, and gets into the air you breathe. Radon typically moves up through the ground to the air above, and into your home through cracks and other holes in the foundation. Radon can also enter your home through well water. Your home can trap radon inside.

Any home can have a radon problem, including new and old homes, well-sealed and drafty homes, and homes with or without basements. In fact, you and your family are most likely to get your greatest radiation exposure at home. That is where you spend most of your time.

Nearly one out of every 15 homes in the United States is estimated to have an elevated radon level (4 pCi/L or more).  Elevated levels of radon gas have been found in homes in your state.

b. The EPA and the Surgeon General recommend that you test your home.

Testing is the only way to know if you and your family are at risk from radon. The EPA and the Surgeon General recommend testing all homes below the third floor for radon.

You cannot predict radon levels based on state, local, or neighborhood radon measurements.  Do not rely on radon test results taken in other homes in the neighborhood to estimate the radon level in your home.  Homes which are next to each other can have different radon levels.  Testing is the only way to find out what your home’s radon level is.

In some areas, companies may offer different types of radon service agreements.  Some agreements let you pay a one-time fee that covers both testing and radon mitigation, if needed.


U.S. Surgeon General’s
Health Advisory

“Indoor radon gas is the second-leading cause of lung cancer in the United States, and breathing it over prolonged periods can present a significant health risk to families all over the country.  It’s important to know that this threat is completely preventable.  Radon can be detected with a simple test, and fixed through well-established venting techniques.”

January 2005

2. I’m selling a home.  What should I do?

a. If your home has already been tested for radon…

If you are thinking of selling your home and you have already tested your home for radon, review the Radon Testing Checklist to make sure that the test was done correctly.  If so, provide your test results to the buyer.

No matter what kind of test you took, a potential buyer may ask for a new test, especially if:

the Radon Testing Checklist items were not met;

the last test is not recent, (e.g., within two years);

you have renovated or altered your home since you tested; or

the buyer plans to live in a lower level of the house than was tested, such as a basement suitable for occupancy but not currently lived in.

A buyer may also ask for a new test if your state or local government requires disclosure of radon information to buyers.

b. If your home has not yet been tested for radon…

Have a test taken as soon as possible. If you can, test your home before putting it on the market.  You should test in the lowest level of the home which is suitable for occupancy. This means testing in the lowest level that you currently live in or a lower level not currently used, but which a buyer could use for living space without renovations.

The radon test result is important information about your home’s radon level.  Some states require radon measurement testers to follow a specific testing protocol.  If you do the test yourself, you should carefully follow the testing protocol for your area or the EPA’s Radon Testing Checklist.  If you hire a contractor to test your residence, protect yourself by hiring a qualified individual or company.

You can determine a service provider’s qualifications to perform radon measurements or to mitigate your home in several ways.  Many states require radon professionals to be licensed, certified or registered.  Most states can provide you with a list of knowledgeable radon service providers doing business in your state.  In states that don’t regulate radon services, ask the contractor if they hold a professional proficiency or certification credential. Such programs usually provide members with a photo-ID card which indicates their qualification(s) and its expiration date.  If in doubt, you should check with their credentialing organization.  Alternatively, ask the contractor if they’ve successfully completed formal training appropriate for testing or mitigation, e.g., a course in radon measurement or radon mitigation.

3. I’m buying a home.  What should I do?

a. If the home has already been tested for radon…

If you are thinking of buying a home, you may decide to accept an earlier test result from the seller, or ask the seller for a new test to be conducted by a qualified radon tester.  Before you accept the seller’s test, you should determine the results of previous testing by finding out:

who conducted the previous test (the homeowner, a radon professional, or some other person);

where in the home the previous test was taken, especially if you may plan to live in a lower level of the home.  For example, the test may have been taken on the first floor.  However, if you want to use the basement as living space, test there, too;

what, if any, structural changes, alterations, or changes in the heating, ventilation, and air conditioning (HVAC) system have been made to the house since the test was done.  Such changes may affect radon levels.

If you accept the seller’s test, make sure that the test followed the Radon Testing Checklist.

If you decide that a new test is needed, discuss it with the seller as soon as possible.

b. If the home has not yet been tested for radon…

Make sure that a radon test is done as soon as possible. Consider including provisions in the contract specifying:

where the test will be located;

who should conduct the test;

what type of test to do;

when to do the test;

how the seller and the buyer will share the test results and test costs (if necessary); and

when radon mitigation measures will be taken, and who will pay for them.

Make sure that the test is done in the lowest level of the home suitable for occupancy. This means the lowest level that you are going to use as living space which is finished or does not require renovations prior to use. A state or local radon official or qualified radon tester can help you make some of these decisions. If you decide to finish or renovate an unfinished area of the home in the future, a radon test should be taken before starting the project, and after the project is finished. Generally, it is less expensive to install a radon-reduction system before (or during) renovations rather than afterward.

4. I’m buying or building a new home.  How can I protect my family?

a. Why should I buy a radon-resistant home?

Radon-resistant techniques work.  When installed properly and completely, these simple and inexpensive passive techniques can help to reduce radon levels.  In addition, installing them at the time of construction makes it easier to reduce radon levels further if the passive techniques don’t reduce radon levels below 4 pCi/L.  Radon-resistant techniques may also help to lower moisture levels and those of other soil-gases.  Radon-resistant techniques:

make upgrading easy:  Even if built to be radon-resistant, every new home should be tested for radon after occupancy.  If you have a test result of 4 pCi/L or more, a vent fan can easily be added to the passive system to make it an active system, and further reduce radon levels.
are cost-effective:  Building radon-resistant features into the house during construction is easier and cheaper than fixing a radon problem from scratch later.  Let your builder know that radon-resistant features are easy to install using common building materials.
save money:  When installed properly and completely, radon-resistant techniques can also make your home more energy-efficient and help you save on your energy costs.

In a new home, the cost to install passive radon-resistant features during construction is usually between $350 to $500.  In some areas, the cost may be as low as $100.  A qualified mitigator will charge about $300 to add a vent fan to a passive system, making it an active system and further reducing radon levels.  In an existing home, it usually costs between $800 to $2,500 to install a radon mitigation system.

b. What are radon-resistant features?

Radon-resistant features may vary for different foundations and site requirements.  If you’re having a house built, you can learn about the EPA’s Model Standards (and architectural drawings) and explain the techniques to your builder.  If your new house was built (or will be built) to be radon-resistant, it will include these basic elements:

  1. gas-permeable layer:  This layer is placed beneath the slab or flooring system to allow the soil gas to move freely underneath the house.  In many cases, the material used is a 4-inch layer of clean gravel.  This gas-permeable layer is used only in homes with basement and slab-on-grade foundations; it is not used in homes with crawlspace foundations.
  2. plastic sheeting:  Plastic sheeting is placed on top of the gas-permeable layer and under the slab to help prevent the soil gas from entering the home.  In crawlspaces, the sheeting (with seams sealed) is placed directly over the crawlspace floor.
  3. sealing and caulking:  All below-grade openings in the foundation and walls are sealed to reduce soil-gas entry into the home.
  4. vent pipe:  A 3- or 4-inch PVC pipe (or other gas-tight pipe) runs from the gas-permeable layer through the house to the roof to safely vent radon and other soil gases to the outside.
  5. junction boxes:  An electrical junction box is included in the attic to make the wiring and installation of a vent fan easier, if, for example, you decide to activate the passive system if your test results show an elevated radon level (4 pCi/L or more).  A separate junction box is placed in the living space to power the vent-fan alarm.  An alarm is installed along with the vent fan to indicate when the vent fan is not operating properly.

5. How can I get reliable radon test results?

Radon testing is easy and the only way to find out if you have a radon problem in your home.

a. Types of Radon Devices

Since you cannot see or smell radon, special equipment is needed to detect it.  When you’re ready to test your home, you can order a radon test kit by mail from a qualified radon measurement service provider or laboratory.  You can also hire a qualified radon tester, very often a home inspector, who will use the radon device(s) suitable to your situation. If you hire a home inspector, make sure you hire a qualified InterNACHI member — specifically, an IAC2 certified air-quality professional.  The most common types of radon testing devices are listed below.

Passive Devices

Passive radon-testing devices do not need power to function.  These include charcoal canisters, alpha-track detectors, charcoal liquid scintillation devices, and electret ion chamber detectors, which are available in hardware, drugstores, and other stores; they can also be ordered by mail or phone.  These devices are exposed to the air in the home for a specified period of time, and then sent to a laboratory for analysis.  Both short-term and long-term passive devices are generally inexpensive. Some of these devices may have features that offer more resistance to test interference or disturbance than other passive devices. Qualified radon testers may use any of these devices to measure the home’s radon level.

Active Devices

Active radon-testing devices require power to function. These include continuous radon monitors and continuous working-level monitors.  They continuously measure and record the amount of radon and its decay products in the air.  Many of these devices provide a report of this information, which can reveal any unusual or abnormal swings in the radon level during the test period. A qualified tester can explain this report to you.  In addition, some of these devices are specifically designed to deter and detect test interference. Some technically advanced active devices offer anti-interference features.  Although these tests may cost more, they may ensure a more reliable result.

b. General Information for All Devices

A state or local radon official can explain the differences between devices, and recommend the ones which are most appropriate for your needs and expected testing conditions.

Make sure to use a radon measurement device from a qualified laboratory.  Certain precautions should be followed to avoid interference during the test period.  See the Radon Testing Checklist for more information on how to get a reliable test result.

Radon Test Device Placement

The EPA recommends that testing device(s) be placed in the lowest level of the home suitable for occupancy. This means testing in the lowest level (such as a basement) which a buyer could use for living space without renovations. The test should be conducted in a room to be used regularly (such as a family room, living room, play room, den or bedroom); do not test in a kitchen, bathroom, laundry room or hallway.  Usually, the buyer decides where to locate the radon test, based on their expected use of the home.  A buyer and seller should explicitly discuss and agree on the test location to avoid any misunderstanding.  Their decision should be clearly communicated to the person performing the test.

c. Preventing or Detecting Test Interference

There is a potential for test interference in real estate transactions. There are several ways to prevent or detect test interference:

Use a test device that frequently records radon or decay-product levels to detect unusual swings.

Employ a motion detector to determine whether the test device has been moved or if testing conditions have changed.

Use a proximity detector to reveal the presence of people in the room, which may correlate to possible changes in radon levels during the test.

Record the barometric pressure to identify weather conditions which may have affected the test.

Record the temperature to help assess whether doors and windows have been opened during the test.

Apply tamper-proof seals to windows to ensure closed-house conditions.

Have the seller/occupant sign a non-interference agreement.

Home buyers and sellers should consult a qualified radon test provider about the use of these precautions.

d. Length of Time to Test

There are two general ways to test your home for radon:

Because radon levels vary from day to day and from season to season, a short-term test is less likely than a long-term test to tell you your year-round average radon level.  However, if you need results quickly, a short-term test may be used to decide whether to fix the home.

Short-Term Testing:

The quickest way to test is with short-term tests. Short-term tests remain in your home from two days to 90 days, depending on the device. There are two groups of devices which are more commonly used for short-term testing. The passive-device group includes alpha-track detectors, charcoal canisters, charcoal liquid scintillation detectors, and electret ion chambers. The active device group consists of different types of continuous monitors.

Whether you test for radon yourself, or hire a state-certified tester or a privately certified tester, all radon tests should be taken for a minimum of 48 hours. A longer period of testing is required for some devices.

Long-Term Testing

Long-term tests remain in your home for more than 90 days. Alpha-track andelectret ion chamber detectors are commonly used for this type of testing. A long-term test will give you a reading that is more likely to tell you your home’s year-round average radon level than a short-term test. If time permits, long-term tests (more than 90 days) can be used to confirm initial short-term results. When long-term test results are 4 pCi/L or higher, the EPA recommends mitigating the home.

e. Doing a Short-Term Test…

If you are testing in a real estate transaction and you need results quickly, any of the following three options for short-term tests are acceptable in determining whether the home should be fixed. Any real estate test for radon should include steps to prevent or detect interference with the testing device.

When Choosing a Short-Term Testing Option…

There are trade-offs among the short-term testing options.  Two tests taken at the same time (simultaneous) would improve the precision of this radon test.  One test followed by another test (sequential) would most likely give a better representation of the seasonal average.  Both active and passive devices may have features which help to prevent test interference.  Your state radon office can help you decide which option is best.

Short-Term Testing Options What to Do Next
Passive:
Take two short-term tests at the same time in the same location for at least 48 hours.

or 

Take an initial short-term test for at least 48 hours.  Immediately upon completing the first test, do a second test using an identical device in the same location as the first test.

Fix the home if the average of two tests is 4 pCi/L or more.

Fix the home if the average of the two tests is 4 pCi/L or more.

Active:
Test the home with a continuous monitor for at least 48 hours.
Fix the home if the average radon level is 4 pCi/L or more.

f.  Using testing devices properly for reliable results.

If you do the test yourself:

When you are taking a short-term test, close windows and doors and keep them closed, except for normal entry and exit.  If you are taking a short-term test lasting less than four days, be sure to:

Close your windows and outside doors at least 12 hours before beginning the test.

Do not conduct short-term tests lasting less than four days during severe storms or periods of high winds.

Follow the testing instructions and record the start time and date.

Place the test device at least 20 inches above the floor in a location where it will not be disturbed and where it will be away from drafts, high heat, high humidity, and exterior walls.

Leave the test kit in place for as long as the test instructions say.

Once you have finished the test, record the stop time and date, re-seal the package, and return it immediately to the lab specified on the package for analysis.

You should receive your test results within a few weeks. If you need results quickly, you should find out how long results will take and, if necessary, request expedited service.

If you hire a qualified radon tester:

In many cases, home buyers and sellers may decide to have the radon test done by a qualified radon tester who knows the proper conditions, test devices, and guidelines for obtaining a reliable radon test result.  They can also:

  • evaluate the home and recommend a testing approach designed to make sure you get reliable results;
  • explain how proper conditions can be maintained during the radon test;
  • emphasize to occupants of a home that a reliable test result depends on their cooperation.  Interference with, or disturbance of, the test or closed-house conditions will invalidate the test result;
  • analyze the data and report measurement results; and
  • provide an independent test.

g. Interpreting Radon Test Results

The average indoor radon level is estimated to be about 1.3 pCi/L; roughly 0.4 pCi/L of radon is normally found in the outside air. The U.S. Congress has set a long-term goal that indoor radon levels be no more than outdoor levels. While this goal is not yet technologically achievable for all homes, radon levels in many homes can be reduced to 2 pCi/L or below.

Radon Test Results Reported in Two Ways

Your radon test results may be reported in either picoCuries per liter of air (pCi/L) or working levels (WL). If your test result is in pCi/L, the EPA recommends you fix your home if your radon level is 4 pCi/L or higher. If the test result is in WL, the EPA recommends you fix the home if the working level is 0.02 WL or higher.  Some states require WL results to be converted to pCi/L to minimize confusion.

Sometimes, short-term tests are less definitive about whether the home is at or above 4 pCi/L, particularly when the results are close to 4 pCi/L. For example, if the average of two short-term tests is 4.1 pCi/L, there is about a 50% chance that the year-round average is somewhat below 4 pCi/L.

However, the EPA believes that any radon exposure carries some risk; no level of radon is safe. Even radon levels below 4 pCi/L pose some risk.  You can reduce your risk of lung cancer by lowering your radon level.

As with  other environmental pollutants, there is some uncertainty about the magnitude of radon health risks. However, we know more about radon risks than risks from most other cancer-causing substances. This is because estimates of radon risks are based on data from human studies on underground miners. Additional studies on more typical populations are underway.

Your radon measurement will give you an idea of your risk of getting lung cancer from radon. Your chances of getting lung cancer from radon depend mostly on:

  • your home’s radon level;
  • the amount of time you spend in your home; and
  • whether you are a smoker or have ever smoked.

Smoking combined with radon is an especially serious health risk. If you smoke or are a former smoker, the presence of radon greatly increases your risk of lung cancer. If you stop smoking now and lower the radon level in your house, you will reduce your lung cancer risk.

Based on information contained in the National Academy of Sciences’ 1998 report, The Health Effects of Exposure to Indoor Radon, your radon risk may be somewhat higher than shown, especially if you have never smoked.  It’s never too late to reduce your risk to lung cancer.  Don’t wait to test and fix a radon problem.  If you are a smoker, stop smoking.

Go to the Radon Risk Comparison Charts

Radon Testing Checklist

For reliable test results, follow this Radon Testing Checklist carefully.  Testing for radon is not complicated.  Improper testing may yield inaccurate results and require another test.  Disturbing or interfering with the test device or with closed-house conditions may invalidate the test results, and is actually illegal in some states.  If the seller or qualified tester cannot confirm that all items have been completed, take another test.

Before conducting a radon test:

Notify the occupants of the importance of proper testing conditions. Give the occupants written instructions or a copy of this Guide and explain the directions carefully.

Conduct the radon test for a minimum of 48 hours; some test devices have a minimum exposure time greater than 48 hours.

When doing a short-term test ranging from two to four days, it is important to maintain closed-house conditions for at least 12 hours before the beginning of the test and during the entire test period.

When doing a short-term test ranging from four to seven days, the EPA recommends that closed-house conditions be maintained.

If you conduct the test yourself, use a qualified radon measurement device and follow the laboratory’s instructions.  Your state may be able to provide you with a list of do-it-yourself test devices available from qualified laboratories.

If you hire someone to do the test, hire only a qualified individual.  Some states issue photo identification (ID) cards; ask to see it.  The tester’s ID number, if available, should be included or noted in the test report.

The test should include method(s) to prevent or detect interference with testing conditions, or with the testing device itself.

If the house has an active radon-reduction system, make sure the vent fan is operating properly.  If the fan is not operating properly, have it (or ask to have it) repaired and then test it.

“Closed-house conditions” mean keeping all windows closed, keeping doors closed except for normal entry and exit, and not operating fans or other machines which bring in air from outside.  Fans that are part of a radon-reduction system or small exhaust fans operating for only short periods of time may run during the test.

During a radon test:

Maintain closed-house conditions during the entire time of a short-term test, especially for tests shorter than one week.

Operate the home’s heating and cooling systems normally during the test. For tests lasting less than one week, operate only air-conditioning units which re-circulate interior air.

Do not disturb the test device at any time during the test.

If a radon-reduction system is in place, make sure the system is working properly and will be in operation during the entire radon test.

After a radon test:

If you conduct the test yourself, be sure to promptly return the test device to the laboratory.  Be sure to complete the required information, including start and stop times, test location, etc.

If an elevated level is found, fix the home. Contact a qualified radon-reduction contractor about lowering the radon level.  The EPA recommends that you fix the home when the radon level is 4 pCi/L or more.

Be sure that you or the radon tester can demonstrate or provide information to ensure that the testing conditions were not violated during the testing period.

6. What should I do if the radon level is high?

a. High radon levels can be reduced.

The EPA recommends that you take action to reduce your home’s indoor radon levels if your radon test result is 4 pCi/L or higher. It is better to correct a radon problem before placing your home on the market because then you will have more time to address a radon problem.

If elevated levels are found during the real estate transaction, the buyer and seller should discuss the timing and costs of the radon reduction.  The cost of making repairs to reduce radon levels depends on how your home was built and other factors. Most homes can be fixed for about the same cost as other common home repairs, such as painting or having a new hot water heater installed. The average cost for a contractor to lower radon levels in a home can range from $800 to about $2,500.

b. How to Lower The Radon Level in Your Home

A variety of methods can be used to reduce radon in homes. Sealing cracks and other openings in the foundation is a basic part of most approaches to radon reduction. The EPA does not recommend the use of sealing alone to limit radon entry.  Sealing alone has not been shown to lower radon levels significantly or consistently.

In most cases, a system with a vent pipe and fan is used to reduce radon.  These “sub-slab depressurization” systems do not require major changes to your home. Similar systems can also be installed in homes with crawlspaces.  These systems prevent radon gas from entering the home from below the concrete floor and from outside the foundation.  Radon mitigation contractors may use other methods that may also work in your home. The right system depends on the design of your home and other factors.

Radon and Home Renovations

If you are planning any major renovations, such as converting an unfinished basement area into living space, it is especially important to test the area for radon before you begin.

If your test results indicate an elevated radon level, radon-resistant techniques can be inexpensively included as part of the renovation. Major renovations can change the level of radon in any home.  Test again after the work is completed.

You should also test your home again after it is fixed to be sure that radon levels have been reduced. If your living patterns change and you begin occupying a lower level of your home (such as a basement) you should re-test your home on that level. In addition, it is a good idea to re-test your home sometime in the future to be sure radon levels remain low.

c. Selecting a Radon-Reduction (Mitigation) Contractor

Select a qualified radon-reduction contractor to reduce the radon levels in your home.  Any mitigation measures taken or system installed in your home must conform to your state’s regulations.

The EPA recommends that the mitigation contractor review the radon measurement results before beginning any radon-reduction work.  Test again after the radon mitigation work has been completed to confirm that previous elevated levels have been reduced.

d. What can a qualified radon-reduction contractor do for you?

A qualified radon-reduction (mitigation) contractor should be able to:

  • review testing guidelines and measurement results, and determine if additional measurements are needed;
  • evaluate the radon problem, and provide you with a detailed, written proposal on how radon levels will be lowered;
  • design a radon-reduction system;
  • install the system according to EPA standards, or state or local codes; and
  • make sure the finished system effectively reduces radon levels to acceptable levels.

Choose a radon-mitigation contractor to fix your radon problem just as you would for any other home repair.  You may want to get more than one estimate.  Ask for and check their references.  Make sure the person you hire is qualified to install a mitigation system.  Some states regulate or certify radon-mitigation services providers.

Be aware that a potential conflict of interest exists if the same person or firm performs the testing and installs the mitigation system.  Some states may require the homeowner to sign a waiver, in such cases. Contact your state radon office for more information.

e. Radon in Water

The radon in your home’s indoor air can come from two sources:  the soil and your water supply.  Compared to radon entering your home through water, radon entering your home through soil is a much larger risk.  If you’ve tested for radon in air and have elevated radon levels, and your water comes from a private well, have your water tested.  The devices and procedures for testing your home’s water supply are different from those used for measuring radon in air.

The radon in your water supply poses an inhalation risk and an ingestion risk.  Research has shown that your risk of lung cancer from breathing radon in the air is much larger than your risk of stomach cancer from swallowing water with radon in it.  Most of your risk from radon in water comes from radon released into the air when water is used for showering and other household purposes.

Radon in your home’s water is not usually a problem when its source is surface water.  Radon in water is more likely when its source is ground water, e.g., a private well or a public water supply system that uses ground water.  Some public water systems treat their water to reduce radon levels before it is delivered to your home.  If you are concerned that radon may be entering your home through the water, and your water comes from a public water supply, contact your water supplier.

If you’ve tested your private well and have radon in your water supply, it can be treated in one of two ways.  Point-of-entry treatment can effectively remove radon from the water before it enters your home.  Point-of-entry treatment usually employs either granular activated-carbon (GAC) filters, or aeration devices.  While GAC filters usually cost less than aeration devices, filters can collect radioactivity and may require a special method of disposal.  Point-of-use treatment devices remove radon from your water at the tap, but only treat a small portion of the water you use, e.g., the water you drink.  Point-of-use devices are not effective in reducing the risk of breathing radon released into the air from all water used in the home.

Water Quality

Water Quality

Drinking Water
  
The United States has one of the safest water supplies in the world. However, national statistics don’t tell you specifically about the quality and safety of the water coming out of your tap. That’s because drinking water quality varies from place to place, depending on the condition of the source water from which it is drawn, and the treatment it receives. Now you have a new way to find information about your drinking water if it comes from a public water supplier (The EPA doesn’t regulate private wells, but recommends that well.  owners have their water tested annually.) Starting in 1999, every community water supplier must provide an annual report (sometimes called a “consumer confidence report”) to its customers. The report provides information on your local drinking water quality, including the water’s source, the contaminants found in the water, and how consumers can get involved in protecting drinking water. You may want more information, or you may have more questions. One place you can go is to your water supplier, who is best equipped to answer questions about your specific water supply. 
 
What contaminants may be found in drinking water?
There is no such thing as naturally pure water. In nature, all water contains some impurities. As water flows in streams, sits in lakes, and filters through layers of soil and rock in the ground, it dissolves or absorbs the substances that it touches. Some of these substances are harmless. In fact, some people prefer mineral water precisely because minerals give it an appealing taste. However, at certain levels, minerals, just like man-made chemicals, are considered contaminants that can make water unpalatable or even unsafe. Some contaminants come from the erosion of natural rock formations. Other contaminants are substances discharged from factories, applied to farmlands, or used by consumers in their homes and yards. Sources of contaminants might be in your neighborhood or might be many miles away. Your local water quality report tells which contaminants are in your drinking water, the levels at which they were found, and the actual or likely source of each contaminant. Some ground water systems have established wellhead protection programs to prevent substances from contaminating their wells. Similarly, some surface-water systems protect the watershed around their reservoir to prevent contamination. Right now, states and water suppliers are working systematically to assess every source of drinking water, and to identify potential sources of contaminants. This process will help communities to protect their drinking water supplies from contamination. 
 
Where does drinking water come from?
A clean, constant supply of drinking water is essential to every community. People in large cities frequently drink water that comes from surface-water sources, such as lakes, rivers and reservoirs. Sometimes, these sources are close to the community. Other times, drinking water suppliers get their water from sources many miles away. In either case, when you think about where your drinking water comes from, it’s important to consider not just the part of the river or lake that you can see, but the entire watershed. The watershed is the land area over which water flows into the river, lake or reservoir. In rural areas, people are more likely to drink ground water that was pumped from a well. These wells tap into aquifers, the natural reservoirs under the earth’s surface, that may be only a few miles wide, or may span the borders of many states. As with surface water, it is important to remember that activities many miles away from you may affect the quality of ground water. Your annual drinking water quality report will tell you where your water supplier gets your water.
How is drinking water treated?
When a water supplier takes untreated water from a river or reservoir, the water often contains dirt and tiny pieces of leaves and other organic matter, as well as trace amounts of certain contaminants. When it gets to the treatment plant, water suppliers often add chemicals, called coagulants, to the water. These act on the water as it flows very slowly through tanks so that the dirt and other contaminants form clumps that settle to the bottom. Usually, this water then flows through a filter for removal of the smallest contaminants, such as viruses and Giardia. Most ground water is naturally filtered as it passes through layers of the earth into underground reservoirs known as aquifers. Water that suppliers pump from wells generally contains less organic material than surface water, and may not need to go through any or all of these treatments. The image The quality of the water will depend on local conditions. The most common drinking water treatment, considered by many to be one of the most important scientific advances of the 20th century, is disinfection. Most water suppliers add chlorine or another disinfectant to kill bacteria and other germs. Water suppliers use other treatments as needed, according to the quality of their source water. For example, systems whose water is contaminated with organic chemicals can treat their water with activated carbon, which adsorbs or attracts the chemicals dissolved in the water.
 
What if I have special health needs?
People who have HIV/AIDS, are undergoing chemotherapy, take steroids, or for another reason have a weakened immune system may be more susceptible to microbial contaminants, including Cryptosporidium, in drinking water. If you or someone you know fall into one of these categories, talk to your healthcare provider to find out if you need to take special precautions, such as boiling your water. Young children are particularly susceptible to the effects of high levels of certain contaminants, including nitrate and lead. To avoid exposure to lead, use water from the cold tap for making baby formula, drinking and cooking, and let the water run for a minute or more if the water hasn’t been turned on for six or more hours. If your water supplier alerts you that your water does not meet the EPA’s standard for nitrates, and you have children under 6 months old, consult your healthcare provider. You may want to find an alternate source of water that contains lower levels of nitrates for your child.
 
What are the health effects of contaminants in drinking water?
The EPA has set standards for more than 80 contaminants that may be present in drinking water and pose a risk to human health. The EPA sets these standards to protect the health of everybody, including vulnerable groups like children. The contaminants fall into two groups, according to the health effects that they cause. Your local water supplier will alert you through the local media, direct mail, or other means if there is a potential acute or chronic health effect from compounds in the drinking water. You may want to contact them for additional information specific to your area. Acute effects occur within hours or days of the time that a person consumes a contaminant. People can suffer acute health effects from almost any contaminant if they are exposed to extraordinarily high levels (as in the case of a spill). In drinking water,microbes, such as bacteria and viruses, are the contaminants with the greatest chance of reaching levels high enough to cause acute health effects. Most people’s bodies can fight off these microbial contaminants the way they fight off germs, and these acute contaminants typically don’t have permanent effects. Nonetheless, when high-enough levels occur, they can make people ill, and can be dangerous or deadly for a person whose immune system is already weak due to HIV/AIDS, chemotherapy, steroid use, or another reason. Chronic effects occur after people consume a contaminant at levels over the EPA’s safety standards for many years. The drinking water contaminants that can have chronic effects are chemicals (such as disinfection byproducts, solvents, and pesticides), radionuclides (such as radium), and minerals (such as arsenic). Examples of these chronic effects include cancer, liver and kidney problems, and reproductive difficulties. 
 
Who is responsible for drinking water quality?
The Safe Drinking Water Act gives the Environmental Protection Agency (EPA) the responsibility for setting national drinking water standards that protect the health of the 250 million people who get their water from public water systems. Other people get their water from private wells which are not subject to federal regulations. Since 1974, the EPA has set national standards for over 80 contaminants that may occur in drinking water. While the EPA and state governments set and enforce standards, local governments and private water suppliers have direct responsibility for the quality of the water that flows to your tap. Water systems test and treat their water, maintain the distribution systems that deliver water to consumers, and report on their water quality to the state. States and the EPA provide technical assistance to water suppliers and can take legal action against systems that fail to provide water that meets state and EPA standards.
What is a violation of a drinking water standard?
Drinking water suppliers are required to monitor and test their water many times, for many things, before sending it to consumers. These tests determine whether and how the water needs to be treated, as well as the effectiveness of the treatment process. If a water system consistently sends to consumers water that contains a contaminant at a level higher than EPA or state health standards regulate, or if the system fails to monitor for a contaminant, the system is violating regulations, and is subject to fines and other penalties. When a water system violates a drinking water regulation, it must notify the people who drink its water about the violation, what it means, and how they should respond. In cases where the water presents an immediate health threat, such as when people need to boil water before drinking it, the system must use television, radio and newspapers to get the word out as quickly as possible. Other notices may be sent by mail, or delivered with the water bill. Each water suppliers’ annual water quality report must include a summary of all the violations that occurred during the previous year.
How can I help protect my drinking water?
Using the new information that is now available about drinking water, citizens can be aware of the challenges of keeping drinking water safe and take an active role in protecting drinking water. There are lots of ways that individuals can get involved. Some people will help clean up the watershed that is the source of their community’s water. Other people might get involved in wellhead protection activities to prevent the contamination of the ground water source that provides water to their community. These people will be able to make use of the information that states and water systems are gathering as they assess their sources of water.  Concerned citizens may want to attend public meetings to ensure that their community’s need for safe drinking water is considered in making decisions about land use. You may wish to participate when your state and water system make funding decisions. And all consumers can do their part to conserve water and to dispose properly of household chemicals.
  • Page 1
  • Page 2
  • Page 3
  • Go to Next Page »

Primary Sidebar

Contact Info

Armstrong Home Inspection Service, LLC
Saginaw, MN 55779
(218) 390-2166

armstronghomeinspectionsvc@gmail.com

About Us

Armstrong Home Inspection Service is certified for virtually all types of home inspections, and we use the latest technology including infrared thermal imaging. We offer Manufactured Home Engineer Certifications. We are a licensed and certified radon measurement professional. We also offer water quality testing.

Whether you are a buyer, seller, lender, or real estate agent, you can trust Armstrong for thorough home inspections at reasonable prices.

Footer

Armstrong Home Inspection Service, LLC

  • Mark Armstrong
  • armstronghomeinspectionsvc@gmail.com
  • (218)390-2166
  • Duluth/Saginaw MN
  • Hours: M-F 7am-7pm & Sat 7am-5pm


Proudly Serving

St Louis, Carlton, and Northern Pine Counties including Duluth, Hermantown, Proctor, Esko, Cloquet, Saginaw, Lakewood, Two Harbors, Rice Lake, Island Lake, Canyon, Cotton, Meadowlands, Hibbing, Chisholm, Virginia, Eveleth, Gilbert, Biwabik, Aurora, Hoyt Lakes, Carlton, Wrenshall, Mahtowa, Barnum, Moose Lake, Sturgeon Lake, Willow River, Sandstone, Brookston, Floodwood, Cromwell, Mcgregor, and Surrounding Areas.

Social Media

YouTube link

Facebook logo

Copyright © 2025 Armstrong Home Inspection Service, LLC. All rights reserved.

  • Home
  • About
  • Services
  • Pricing
  • Sample Reports
  • Contact Us
  • Blog
  • Schedule Inspection